


Getting Started
18
• On the power meter, press , (or / ).
During zeroing the wait symbol is displayed.
• When the wait period is complete connect the Agilent E-series power
sensor to the power meter’s POWER REF output.
• Press (or , / ). The wait symbol is again
displayed during calibration.
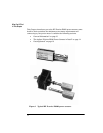
On completion the power meter and sensor are ready to connect to the device
under test (DUT). Ensure the attenuator is re-connected to the
Agilent E-series E9300B or E9301B sensors prior to making measurements.
Caution The Agilent E-series E9300B or E9301B sensors should not be
operated without the attenuator connected at any time other than for
calibration. You must ensure the attenuator is reconnected following
calibration.
WARNING BEFORE CONNECTING THE POWER SENSOR TO OTHER
INSTRUMENTS ensure that all instruments are connected to
the protective (earth) ground. Any interruption of the
protective earth grounding will cause a potential shock hazard
that could result in personal injury.
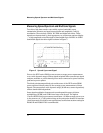
The measurement connector (for connection to DUT) is Type-N (male) for all
the HP E-series E9300 power sensors. A torque wrench should be used to
tighten these connectors. Use a 3/4-inch open-end wrench and torque to 12
in-lb (135 Ncm) for the Type-N connector.
Specifications
The specifications listed in Chapter 3, Specifications and Characteristics, are
the performance standards or limits against which the power sensor may be
tested. These specifications are valid ONLY after proper calibration of the
power meter. Refer to the “Calibration Procedure Using Agilent E-Series
Power Sensors” in your Agilent EPM series power meter User’s Guide.
Zero
Cal
Zero Zero A Zero B
Cal Cal Cal A Cal B