


-25-
)!$"$%
Before cutting any wood on your saw, study all of
the “Basic Saw Operations”.
Notice that in order to make some of the cuts, it is
necessary to use certain devices, “Work Helpers”,
like the Push Stick, the Push Block and the Auxiliary
Fence, which you can make yourself.
After you have made a few practice cuts, make these
“help ers” before starting any projects. Make the
“Push Stick” first. (A push stick is included standard
with the GTS1031).
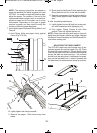
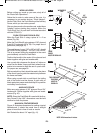
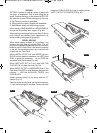
"'%%& "'%!
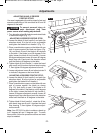
Make the Push Stick using a piece of 1 x 2 as
shown (Fig. 38).
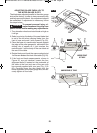
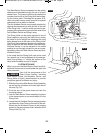
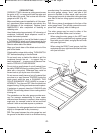
Make the Push Block using pieces of 3/8” plywood
and 3/4" hardwood (Fig. 39). For proper use of
push block (see page 30).
The small piece of wood, 3/8” x 3/8” x 2-1/2”, should
be GLUED to the plywood… DO NOT USE NAILS.
This is to prevent dulling the sawblade in the event
you mistakenly cut into the Push Block.
Position the handle in the center of the plywood and
fasten together with glue and woodscrews.
Use a push stick whenever the fence is 2 inches or
more from the blade. Use a push block when the op-
eration is too narrow to allow the use of a push stick.
For proper use, see page 30.
Both a push stick or block should be used in the place
of the user’s hand to guide the material only between
the fence and blade.
When using a push stick or push block, the trailing
end of the board must be square. A push stick or
block against an uneven end could slip off or push the
work away from the fence.
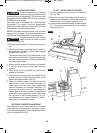
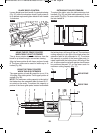
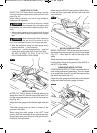
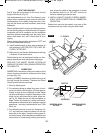
'*$+
Make one using pieces of 3/8" plywood and 3/4"
hardwood . Fasten together with glue and wood-
screws (Fig. 40).
!& Since the Push Block is used with the Aux-
iliary Fence , the 4-3/4" dimensions must be held
identical on both the pieces.
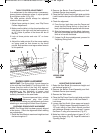
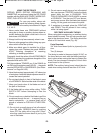
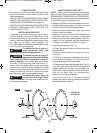
&$!$
Figure 41 illustrates dimensions for making a typical
feather board. It should be made from a straight
piece of wood that is free of knots or cracks.
Kerf should be about 1/4" apart (fig. 41).
45°
NOTCH
WORKPIECE
END
FIG. 38
4
THESE
EDGES
MUST BE PARALLEL
FIG. 39
THIS FACE AND
THIS EDGE
MUST BE
PARALLEL
FIG. 40
NOTE: All dimensions in inches.
5
FIG. 41
BM 2610014415 01-11 E:BM 2610012089 12-10 E 1/10/11 7:17 AM Page 25