


FULL ONE YEAR WARRANTY ON CRAFTSMAN BAND SAW
If within one year from the date of purchase, this Craftsman Band Saw tails due to adefect in material or workmanship,
Sears will repair it, free of charge.
WARRANTY SERVICE IS AVAILABLE BY SIMPLY CONTACTING THE NEAREST BEARS SERVICE
CENTER/DEPARTMENT THROUGHOUT THE UNITED STATES.
This warranty applies only while this product is used in the Unltad States.
This warranty gives you specific legal rights and you may also have other rights which vary from state to state.
SEARS, ROEBUCK AND CO., DEPT. 698/731A Sears Tower, Chicago, IL 60684
TABLE OF CONTENTS
Section Title Page Number
General Safety Instructionsfor
Power Tools .......................... 3
Additional Safety Instructions for
Band Saw ............................ 4-5
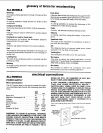
Glossary of Terms for Woodworking .......... 6
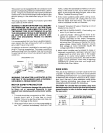
Electrical Connections .................... 6-7
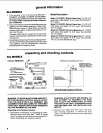
General Information ...................... 8
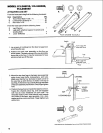
Model Description ....................... 8
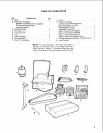
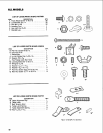
Unpacking and Checking Contents .......... 8-10
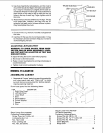
Assembling Leg Set ...................... 11-13
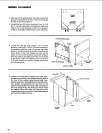
Assembling Cabinet ...................... 13-15
Mounting the Saw to the Cabinet ............ 15-16
Mounting Door .......................... 16
Attaching the Handwheel .................. 17
Mounting the Motor ...................... 17-19
Connecting the Motor ..................... 20
Selecting Blade Speed .................... 21
Recommended Speed Settings ............. 21
Changing Speed Settings ................. 21
Attaching Trim Caps ...................... 22
Getting to Know Your Band Saw ............ 23'
Location and Function of the
Electronic Indicator System .............. 24-25
Installingthe Blade ....................... 26-27
Aligning the Blade and
Blade Guide Assemblies ................. 28-30
Mounting the Front Table .................. 30-32
Squaring the Blade to the Table ............. 32
Adjusting Front Table ..................... 33
Location and Function of Controls ........... 34
Tilting Head for Bevel Cut ................. 35
Adjusting Bevel Lock Knob ................ 35
Basic Band Saw Operation ................ 36
Installing Sanding Attachment .............. 37
Installing the Sanding Belt ................. 37
Recommended Accessories ................ 38
Maintenance ............................ 38-39
Trouble Shooting--All Models .............. 39
Trouble Shooting--Motor .................. 40
Trouble Shooting--Electronics .............. 41-42
Parts Lists ............................. 43-50
Leg Set .............................. 43
Drive Assembly ........................ 44-45
Base Components ..................... 46-47
Bevel Drive and Motor Mount
Assembly Parts ...................... 48-49
Cabinet .............................. 50