


general information
ALL MODELS
1. This manual is for the following Models--
113.248210,113.248320,113.248440, and113.248510.
All sectionsare labeled withthe correctmodel num-
ber.Follow ONLY instructions that are meant for
your model saw.
2. Ifyou aremissing anypart(s)whileputtingyour saw
together, do not continue assembly. Contact your
Sears Service Center or Retail Store and get the
missing part(s) before continuing assembly or try-
ingto use the saw.
Complete parts lists are located at the end of this
manual. Usethese liststoidentifythe number ofany
missingpart.
3. Sometimes small parts get lost inpackaging materi-
als.Do notthrowaway any packaging untilyoursaw
isput together. Ifyou are missinga part, check the
packaging before contacting Sears.
Model Description
Model 113.248210: Manual Band Saw; 18x 23 inch
work table; sLngle speed; 1/2H.P. motor that develops 1
H.P.; legset.
Model 113.248320: Manual Band Saw; 27 x 23 inch
work table; two speed; 5/a H.P. motor that develops
11/8H.R; legset.
Model 113.248440: Electronic Band Saw; 27 x 23 inch
work table; two speed; % H.P. motor that develops
11/8H.P.;legset.
Model 113.248510: Electronic Band Saw; 27 x 23 inch
work table; two speed; 5/8 HP. motor that develops
11/8H.P.;23 inch cabinet with door.
unpacking and checking contents
ALL MODELS
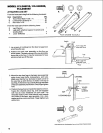
TOOLS NEEDED
MEDIUM SCREWDRIVER
PRI-,, SSCREWDRmVE. @
.......... 318" WRENCH
:_ 7/16" WRENCH
9/16" WRENCH
SQUARE _/
7116" SOCKET
9/16" SOCKET
1/8" HEX "L" WRENCH
5/32" HEX "L" WRENCH _ SOCKET WRENCH
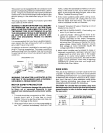
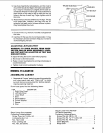
COMBINATION SQUARE MUST BE TRUE
f__./
€
STRAIGHT EDGE GF
BOARD 3/4-INCH THICK
THIS EDGE MUST BE
PER_CTLY STRAIGHT
DRAW LIGHT
LINE ON BOARD
ALONG THIS EDGIE
t,_
/
SHOULD BE NO GAP OR OVERLAP HERE WHEN
SQUARE IS FLIPPED OVER IN DOTTED POSITION
WARNING: TO AVOID INJURY FROM UNEXPECT-
ED STARTING OR ELECTRICAL SHOCK, DO NOT
PLUG THE SAW IN UNTIL ALL ASSEMBLY AND
ALIGNMENT STEPS ARE COMPLETE. THE POWER
CORD MUST REMAIN UNPLUGGED WHENEVER
YOU ARE WORKING ON THE SAW.
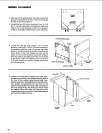
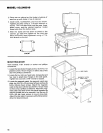
Unpacking and Checking Contents
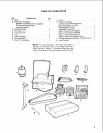
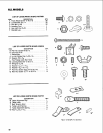
1. Separate all "loose parts" from packaging mater-
ials and check each item with "Table of Loose
Parts" to make sure all items are accounted for,
before discarding any packing material.
WARNING: IF ANY PARTS ARE MISSING, DO
NOT ATTEMPT TO ASSEMBLE THE BAND
SAW, PLUG IN THE POWER CORD, OR TURN
THE SWITCH ON UNTIL THE MISSING PARTS
ARE OBTAINED AND ARE INSTALLED COR-
RECTLY.
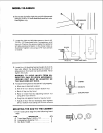
2. Remove front table and front cover first while
saw is being unpacked. TO remove the front
cover, pull thecover at the neck and underside of
throat area.