


Sears recommends the following Accessories
Caster Set for Leg Set ........... 9-22222, 9-22221
Miter Gauge ............................ 9-29929
Hold-Down Clamp for Miter Gauge ....... 9-29928
Stop-Rods for Miter Gauge .............. 9-29924
Rip Fence .............................. 9-23402
Blades and Sanding Belts ............ See Catalog
Circle Cutting Attachment ............... 9-23411
Power Tool Know How Handbooks
Radial Saw (includes band saw section)., 9-2917
Table Saw (includes band saw section)... 9-2918
Sears may recommend other accessories net listed in
the manual. See your nearest Sears store or Catalog
department for other accessories.
Do not use any accessory unless you have received and
read complete instructions for its use.
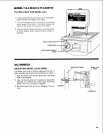
ALL MODELS
maintenance
WARNING: FOR YOUR OWN SAFETY, TURN
SWITCH "OFF" AND REMOVE PLUG FROM POWER
SOURCE OUTLET BEFORE MAINTAINING OR
LUBRICATING YOUR BAND SAW.
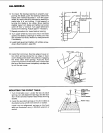
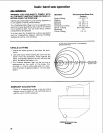
Tires
Pitch and sawdust that build up on the tires should
be removed with a stiff brush or scraped off with a
piece of wood.
CAUTION: To avoid damaging the tires do not use a
sharp knife or any kind of solvent.
When the tires become worn they should be replaced.
When replacing the tires, stretch them around the
wheels but do not glue them on.
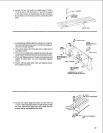
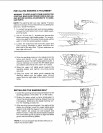
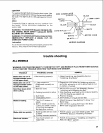
ADJUSTING BAND SAW BEVEL TRAVEL
If the band saw will not hold its position when at a
bevel angle, and before the bevel look is locked, or if
it is difficult to change the bevel angle, an adjustment
is necessary to correct the force required to bevel
the band saw.
To adjust the force required to bevel the band saw,
locate the three (3) capscrews holding the frame to
the motor mount. The capscrews are located in the
recessed area behind the hub of the lower wheel at
the 2 o'clock, 6 o'clock, and 10 o'clock positions. Use
a 3/16-inch hexagonal "L" wrench that has a 4-inch
leg, reach between the spokes of the lower wheel to
the capscrews. Adjust the capscrews equally until
the bevel action is smooth and the saw wilt hold its
position before the bevel lock is locked.
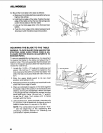
ADJUSTING THE UPPER BLADE GUIDE
TRAVEL
If the upper guide bar will not move up and down
easily or falls when the lock knob is loosened, the
following adjustment should be performed.
1. Remove the Guide Bar Lock Knob and the
washer which is under it.
2. Using a 7/16" socket or wrench, tighten the nut
which is under the washer to just tight.
3. Then loosen the same nut 1 turn.
4. Move the guide bar up and down to check for
smooth movement while still holding its position
when released.
5. Make further adjustments to the nut as required
to get the guide bar to move smoothly and hold
its position when released.
6. Reinstafl the washer and Guide Bar Lock Knob.
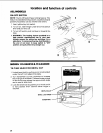
General Maintenance
Keep your band saw clean. Remove the sawdust
from the inside. Vacuum or blow out frequently.
Do not allow filth to build up on the table, the guides
orthe back-up bearings. Clean them with Craftsman
Gum and Pitch Remover.
CAUTION: Do not immerse the backup bearings in
the gum and pitch remover.
Put a thin coat of paste wax on the table so that the
wood slides easily while cutting.
38