


INSTALLING SANDING ATTACHMENT
WARNING: TO AVOID INJURY FROM UNEXPECTED
STARTING, MAKE SURE POWER CORD IS UNPLUG-
GED BEFORE MAKING ADJUSTMENTS TO BAND-
SAW PARTS.
NOTE: The sanding bett cuts very rapidly. Practice
with some scraps of wood first before you attempt to
sand your actual workpiece.
1. To install the sanding belt and sanding platen,
remove the front table, front cover, blade guard,
and the blade.
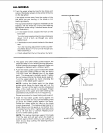
2. Use a 1/8-inch hex "L" wrench and remove the
upper and lower right blade guides. The mount-
ing screw used for the upper blade guide will be
used to hold the sanding platen in place.
3. Loosen the setscrews that hold the upper and
lower backup bearings in place and push the
bearings all the way back_ Tighten setscrews so
bearings will remain.
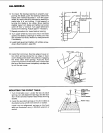
4. Slide the sanding platen into the blade slot in the
table and fasten to the upper blade guide
assembly where the right blade guide mounts. It
may be necessary to loosen the left blade guide
and slide it backwards until platen is in place.
5, Slide the upper left blade guide towards the
sanding platen and tighten mounting screw
securely.
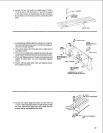
6. Slide the lower teft blade guide towards the
sanding platen until the platen rests 1/8-inch
away from the right edge of the slot in the work
table,
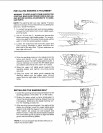
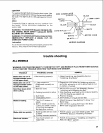
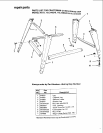
SANDING PLATEN
INSTALLING THE SANDING BELT
1. Install the sanding belt and adjust tension to the
sanding position. (The letter "S" on the scale.)
2. Rotate the upper wheel by hand (clockwise) to
check the sanding belt tracking. Adjust tracking
if necessary. (Reference the blade tracking sec-
tion for tracking procedure.)
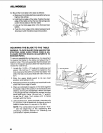
3. After tracking the sanding belt if the belt and the
platen do not align loosen the upper blade guide
support and slide the support in or out to align.
Then tighten set screws to hold support and
platen in place, it may also be necessary to adjust
the lower blade guide support to align the blade
guide with the sanding platen.
NOTE: A new sanding belt will stretch with use, so
check the tension often.
SANDING
BELT
,Ii I
' %
. i_ii
!1-'2