


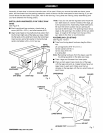
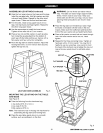
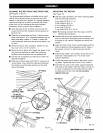

INSTALLING THE FRONT RAIL
See Figures 15 and 16.
• Get the front rail pieces, the switch assembly, and
the following hardware:
6 square head bolts (5/16-18 x 1 in.)
6 flat washers (5/16 in.)
6 hex nuts (5/16-18)
2 screws (1/4-20 x 3/8 in.) (located on switch plate)
2 square nuts (1/4-20) (located on switch plate)
Front rail connector
Right and left end caps for front rail
2 screws (#8-32 x 1/2 in.)
• Set aside end caps and screws until you have
aligned the rip fence and front rail.
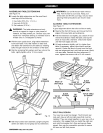
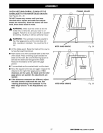
• Insert the six square head bolts into the table and
extensions, so the bolt heads extend outward 1/2 in.
• Loosely attach a washer and a hex nut to each
bolt.
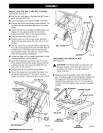
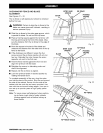
• The back of the rail has two slots. Slide the upper
slot over the bolts. (Bottom slot is for switch.)
• Align the right rail from left to right - Match the
7-1/8 in. mark on the right scale to the right
edge of the table saw base (main table). See
Figure 16.
• Snug right rail against table. Finger-tighten each
nut on the table and extensions.
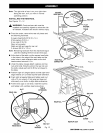
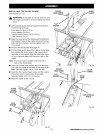
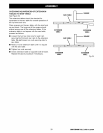
• Locate the switch assembly. The two screws are
installed through the back of the switch plate with
the square nuts extending out toward the front.
Note: The square nuts are loose on the switch plate.
• Slide the square nuts into the lower slot of the rail.
• Slide the switch assembly to a convenient position,
leaving ample clearance for the handwhee].
Tighten securely with a screwdriver. Do not tighten
the rail bolts.
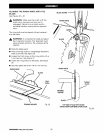
• Attach the end caps and screws with a phillips
screwdriver.
,_ WARNING: Place the switch out of the
immediate work area to avoid accidentally
turning it off during operation.
SAWTABLE TABLE
EXTENSION
8"UARE _ _HEX NUT
HE_ BOLT8
__ _'_-.._ WASHER
FRONT RAIL_/_ _ -_
CONNECTOR
_ %,_,,,,,,_,,,__ \_,_ <_. r _ Fig. 15
FRONTRAIL
ENDCAP
SCALE
8CREW
TABLE
EXTENSION
RAIL 8LOT
FRONTRAIL
7-118in, MARK
RIGHTSCALE
FRONTRAIL
8WITCH
WITHKEY
Fig. 16
rRI;IFTSMRN*TABLE SAW315.228390 22