


To avoid unnecessary setups and adjustments, a
good practice is to check your setups carefully with a
framing square and make practice cuts in scrap wood
before making finish cuts in good workpieces. Do not
start any adjustments until you have checked with a
square and made test cuts to be sure adjustments
are needed.
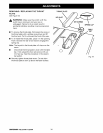
REPLACING THE BLADE
See Figures 35- 37.
_ WARNING: Make sure the switch is off, the
switch key is removed, and your saw is
unplugged. Failure to do so could result in
accidental starting, resulting in serious personal
injury.
TO LOOSEN
BLADENUT
BLADE
GUARD
BLADE
NUT
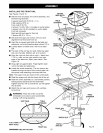
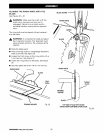
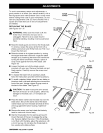
• Raise the blade guard and remove the throat plate.
To remove, loosen the screw at the front with a
phillips screwdriver and lift the front end. Pull it out
toward the front end.
• Raise the blade to its highest position by turning
the height handwheel clockwise. Angle the blade
straight up by loosening the bevel lock handle and
turning the bevel handwheel. Wedge a piece of
scrap wood against the front of the blade. See
Figure 35.
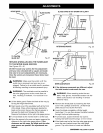
• Loosen the blade nut with the blade wrench
provided with your saw. Remove the blade nut and
blade washer. Carefully remove the scrap wood
and blade.
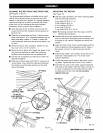
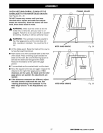
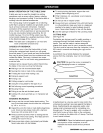
• To replace the blade with an accessory blade,
follow the instructions provided with the accessory.
• To install a standard blade, place the new blade on
the arbor shaft, with teeth pointing down toward the
front of the saw. Wedge a piece of scrap wood at
the back of the blade. See Figure 37.
_k CAUTION: The teeth must point down toward
the front of the saw to work properly. Otherwise,
damage to the blade, saw, or workpiece can
OCCUr.
SCRAPWOOD
.BLADE
WASHER
Fig. 35
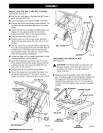
_/_ BLADE
BLA__I WASHER
//_ULADE NUT
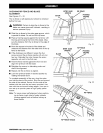
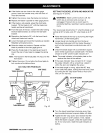
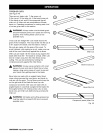
• Place the blade washer and the blade nut over the
blade arbor. Be sure the dome side of the blade
washer faces out from the blade and that all items
are snug against the arbor housing. Tighten se-
curely.
• Remove the scrap wood and rotate the blade by
hand to make sure it turns freely.
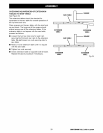
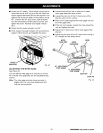
• Slip the throat plate into the opening and push it
toward the back of the saw to engage the spring
clip. Securely tighten the screw. If the throat plate
is not flush with the table, adjust the setscrews with
a 2 mm hex key. Do not allow the throat plate to
bow up above the table surface.
ARBORBHAFT
/
Fig. 36
{:RRFTBMI_N_TABLESAW315.228390 30