


8CRAPWOOD
BLADEGUARD
BLADE
NUT
BLADEGUARD18NOTSHOWNFORCLARITY
I MARKEDTOOTH
AT FRONT
__
FRAMING
SQUARE
BLADE
WASHER
TOTIGHTEN
BLADENUT Fig. 37
HEELING (PARALLELING) THE SAWBLADE
TO THE MITER GAGE GROOVE
See Figures 38- 40.
DO NOT loosen any screws for this adjustment
until you have checked with a square and made
test cuts to be sure adjustments are necessary.
Once the screws are loosened, these items must
be reset.
,_ WARNING: Make sure the switch is off, the
switch key is removed, and your saw is un-
plugged. Failure to do so could result in acciden-
tal starting, resulting in serious personal injury.
_, WARNING: The sawblade must be parallel to
the miter gage groove so the wood does not
bind, resulting in kickback. You could be hit or
cut.
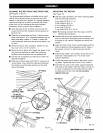
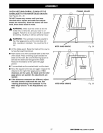
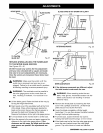
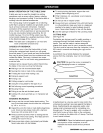
• Lift the blade guard. Raise the blade all the way by
turning the height handwheel.
• Mark beside one of the sawblade teeth at the front
of the blade. Place a framing square beside the
blade on the mark. Be sure the framing square is
between the teeth and flat against the blade.
Measure the distance to the right miter gage groove.
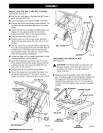
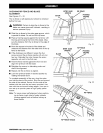
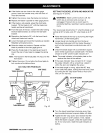
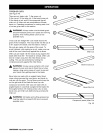
• Turn sawblade so the marked tooth is at the back.
• Move the square to the rear and again measure the
distance to the right miter gage groove. If the
distances are the same, the blade and the miter
gage groove are parallel. No adjustments are
needed.
MITERGAGEGROOVE Fig. 38
C33
MARKEDTOOTH
AT BACK
G FRAMING
SQUARE
31
MITERGAGEGROOVE Fig. 39
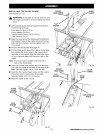
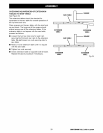
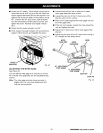
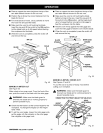
• If the distances measured are different, adjust
the table bracket underneath the saw.
_lb WARNING: When reaching under the saw
table, wear gloves. Accidental contact with the
blade could cause a cut resulting in serious
personal injury.
• Remove the throat plate by loosening the front
screw with a phillips screwdriver. Lift the throat
plate and pull it out by the front end.
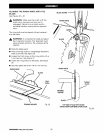
• Lower the blade completely with the height
handwheel. You can then access the table brackets
through the throat plate opening.
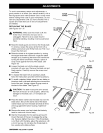
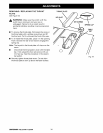
• From the back, loosen the three rear screws
holding rear table bracket using a 12 mm wrench.
• If the blade was too far from the miter gage groove,
move the rear bracket toward the miter gage
groove. Tap with a block of wood and hammer.
CI_RFTSMRN_TABLESAW315.228390