


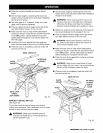


• Place a support the same height as the top of the
saw table behind the saw for the cut work.
• Position the rip fence the correct distance from the
blade for the cut.
• For small pieces of wood, use a pushstick to move
the wood into and past the blade.
• Make sure the wood is not touching the blade.
Insert the key and lift the switch to the ON position.
Let the blade build up to full speed before feeding
the workpiece into the blade.
• When the work is completed, press the switch off
and remove the key.
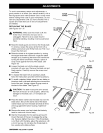
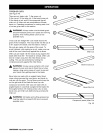
RIPCUT
BLADE __ SCALE
__ili_ FENCE,Fig. 49
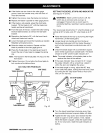
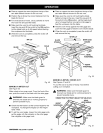
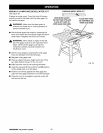
MAKING A MITER CUT
See Figure 50.
Make a test cut on scrap wood. From the front of the
saw, push the wood to the blade with the miter gage.
_ WARNING: Make sure the blade guard is
lowered over blade and is working properly to
prevent possible injury.
• Check that the blade is at the correct height for the
workpiece. To change the height, turn the height
hand wheel.
• To set the wood angle, loosen the miter gage knob,
set the angle with the indicator on the miter gage,
then retighten miter gage knob.
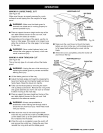
• Place a support the same height as the top of the
saw table behind the saw for the cut work.
• Make sure the wood is not touching the blade
before turning on the saw. Insert the key and lift
the switch to the ON position. Let the blade build
up to full speed before moving the miter gage to
feed the workpiece into the blade.
• Hold the work firmly against the miter gage and
push the miter gage to feed the work into the blade.
• When the work is completed, press the switch off
and remove the key.
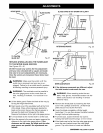
MITERCUT
BLADE _ MITERGAGE
STRAIGHT ANGLED
BEVEL
HANDWHEEL
HEIGHT
HANDWHEEL
Fig. 50
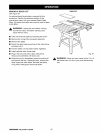
MAKING A BEVEL CROSS CUT
See Figures 51 and 52.
Try out this cut on a piece of scrap wood before
cutting your workpiece.
_ WARNING: Make sure the blade guard is
lowered over blade and is working properly to
prevent possible injury.
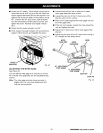
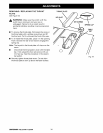
VIEWEDFROMTHEFRONT,BELOWTHETABLESAW
BEVEL
LOCKHANDLE
HEIGHT
HANDWHEEL
TO
LOOSEN
TO TIGHTEN Fig. 51
rRFIFI"$MFIN_TABLESAW315.228390 38