


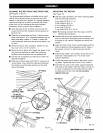
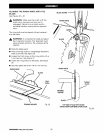
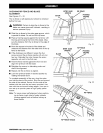

CHECKING RIP FENCE AND BLADE
ALIGNMENT
See Figures 31 - 33.
The rip fence is self-a(igning but should be checked
before first use.
,_ WARNING: Failure to align the rip fence to the
blade can cause jams and kickback, resulting in
serious personal injury.
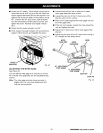
• Slide the rip fence to the miter gage groove, which
is parallel to blade. Do not lock the rip fence.
• Place a framing square against the rip fence, with
the long end towards the front of the blade. Mea-
sure the distance from the rip fence to the edge of
the blade.
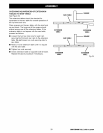
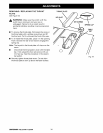
• Move the square to the back of the blade and
measure the distance from the other end of the rip
fence to the blade.
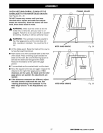
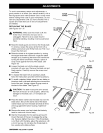
• If the distances are different, loosen the four
screws around the rip fence handle with a 6 mm
hex key. Alternate the order (loosen the screw
opposite, not next to the first one).
• Hold the fence handle against the front rail and
align the rip fence with the blade.
• Retighten the screws in alternating order and
check the alignment.
• Repeat until the rip fence is aligned.
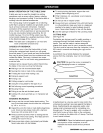
• Lock the rip fence handle in desired position by
rotating the handle down.
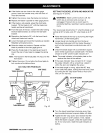
To complete assembly of the saw, plug the motor
cord into the back of the switch. Run the cord around
the side of the cabinet. Secure it to the side of the
cabinet with the cord clip and screw provided. Use
care with the cord around sharp edges. Your saw is
now set up to provide years of high quality perfor-
mance.
Note: To insure proper self alignment when position-
ing rip fence, push sides of scale indicator
housing against front rail before locking rip
fence handle.
BLADE
BLADE
8CREW8
MITER GAGE
GROOVE
MITER GAGE
GROOVE
RIP FENCE
FRAMING
SQUARE
Fig. 31
RIP FENCE
FRAMING
SQUARE
Fig. 32
RIP FENCE
RIP FENCEHANDLE
Fig. 33
rRRFTSMRN*TABLE SAW315.228390 28