


Copyright© 2006 Digital Spectrum Solutions, Inc. Page 48
either a PC (running Digital PixMaster software) or a USB memory-card-
reader in order to get its images into the MemoryFrame. Check the Digital
Spectrum website for a list of cameras which are compliant to the
Microsoft USB Mass Storage specification. You may also want to contact
Digital Spectrum customer support at to see if there is a software upgrade
available to support the camera.
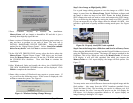
Q: With my camera connected, MemoryFrame doesn’t display any images,
even though I know there are images in the camera.
A: The camera may be storing images in a non-standard format.
MemoryFrame camera connection only supports standard JPEG (.JPG)
files. Consult the camera’s documentation to learn if the camera can be
configured to store images in JPEG (.jpg) format. Alternatively, you can
transfer the images first to the PC. The bundled Digital PixMaster
software can download the following image formats to MemoryFrame:
JPEG, TIFF, BMP, PNG, or GIF.
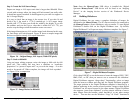
Q: With my camera connected, image display seems to be slow.
A: The image files may be very high-resolution. Large image files take longer
to display. Many cameras allow you to choose between different image
storage resolutions. To maximize MemoryFrame responsiveness, take the
images with the camera a lower resolution setting.
Q: I have attached a USB card reader to MemoryFrame with my camera’s
memory-card inserted, but MemoryFrame does not recognize the USB
card-reader.
A: Even though the card-reader is a USB model, the card-reader may not
support the USB Mass Storage specification. The DirectConnect
TM
feature
of MemoryFrame allows a user to directly attach a USB card-reader
without the need for a PC. For this DirectConnect feature of
MemoryFrame, it is specified that the card-reader needs to support the
USB Mass Storage specification. This spec (co-authored by Microsoft) is
built into Windows 98SE, Windows ME, Windows 2000, and Windows
XP. If a card-reader supports this specification, then it does NOT need its
own custom driver from the card-reader manufacturer for Windows to
recognize and be able to utilize as a “drive letter” in Windows Explorer.
This specification allows you to drag images from the card-reader onto the
hard-drive without requiring a custom Driver. If the card-reader is not
recognized by MemoryFrame, then the card-reader won’t work in
DirectConnect mode. Such a non-compliant card-reader must use a PC
(running Digital PixMaster software) in order to get its images into the
MemoryFrame.
Copyright© 2006 Digital Spectrum Solutions, Inc. Page 5
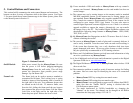
Forward (►) When a slideshow is playing, press the ► button to
open to thumbnail view and advance to a desired
image. When using the onboard Menu (see Menu
button), use this button to highlight the next menu
option. After selecting the Volume or Brightness
function, this button is used to increase (+) the
volume/brightness level.
Select When using the onboard Menu (see Menu button),
this button functions as the “Select” key in order to
select an image or menu option.
Reverse (◄) When a slideshow is playing, press the ◄ button to
open to thumbnail view and reverse to the desired
image. When using the onboard Menu (see Menu
button), use this button to highlight the previous menu
option. After selecting the Volume or Brightness
function, this button is used to decrease (-) the
volume/brightness level.
Menu This button is used to enter the Onboard Menu
system. The Menu system is used to:
1. Delete images from the slideshow.
2. Upload or play images from a camera,
memory card reader, thumb drive.
3. Adjust the control effects of images.
Pause ( || ) Press the || button to manually pause or continue the
slide show. When the show is paused, the || button
resumes the slideshow. The screen will momentarily
display a text message indicating the state of
Pause/Resume.
Brightness MemoryFrame screen brightness can be adjusted for
different ambient lighting conditions. With the
slideshow in operation, adjust the brightness to create
the optimum display setting. Use this button and the
► and ◄ buttons to change the brightness of the
image. An onscreen meter is displayed, indicating the
current brightness setting (%). Holding the ► and ◄
down will activate scrolling for high speed changes.
Note: the Brightness button responds only when