


Copyright© 2006 Digital Spectrum Solutions, Inc. Page 28
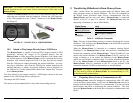
Important! For Memory Card Readers, make sure that the memory-card is
already inserted into the card reader before connecting the USB cable to the
MemoryFrame.
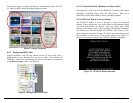
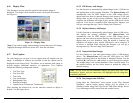
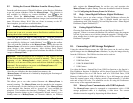
Connect the MemoryFrame directly to the USB peripheral using the USB
cable that was provided with the peripheral. Connect the USB connector
of the USB peripheral to the “Camera” connector of the MemoryFrame.
See Figure 15.
FIGURE 15 – CONNECTING A USB PERIPHERAL
10.2 Upload or Play Images Directly from a USB Device
The MemoryFrame is capable of playing JPEG images located in USB
peripherals, allowing the images to be uploaded directly into the
MemoryFrame to either append the internal slideshow with images until
the internal memory of the MemoryFrame is full or replacing the existing
slideshow with external images until full. You may also play the images
form the USB device without disturbing the internal slideshow. You may
also play a slideshow (.pd2) from the USB device without disturbing the
internal slideshow, or replace an internal slideshow from a slideshow on
the USB device. Use the onboard Menu button and “Import/Play” function
on the MemoryFrame.
You may upload or play images stored in a USB digital camera in the same
manner as any USB storage device, making sure:
The images are JPEG format
The camera is in the standard (driver-less) mode when taking pictures
Copyright© 2006 Digital Spectrum Solutions, Inc. Page 25
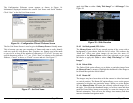
9. Transferring Slideshows to/from MemoryFrame
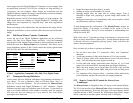
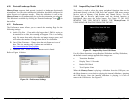
Table 2 below shows the various options under the Digital Frame and
Help pull-down menus in Digital PixMaster. The four (4) commands in
the Digital Frame pull-down menu involve communication with the
MemoryFrame and can only used when a MemoryFrame is connected
directly to the PC or part of a network. The MemoryFrame must be
displaying a slideshow (i.e. not in Menu Mode).
Table 2 – Additional Commands
Note: Exit any on-board-button menus to return to displaying the current
slideshow. This will place the MemoryFrame in the mode that is required
to communicate with the PC.
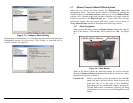
When the MemoryFrame is connected to a computer running Digital
PixMaster™, the MemoryFrame accepts and processes communication
between the computer and the MemoryFrame. Digital PixMaster™ can
retrieve the current slideshow in a MemoryFrame to the PC (retrieve) for
saving or editing, or it can replace the slideshow in the MemoryFrame
with a new one from the computer (send). To transfer slideshows from the
PC to the MemoryFrame or from MemoryFrame back to the PC, the
MemoryFrame must be connected to the PC via the different USB
connection methods (USB direct and wireless or wired Ethernet).
Important! For Digital PixMaster to communicate to the MemoryFrame,
you first need to prepare the MemoryFrame for communicating to a PC,
as described in the section below.
9.1 Preparing MemoryFrame to Communicate to a PC
The MemoryFrame cannot be managed or communicate with a PC while
it is in the Menu system mode. In all cases, the MemoryFrame must be in
Display mode for Digital PixMaster™ to communicate. Exit any on-board
button menus and return to displaying the current slideshow. This will
place the MemoryFrame in the mode that is required to communicate with
the PC.
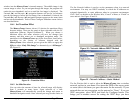
Digital Frame Help
S
end Slideshow
C
ontents
R
etrieve Slideshow
Release Notes
Update Firmware
A
bout Di
g
ital PixMaster…
Properties