


Copyright© 2006 Digital Spectrum Solutions, Inc. Page 42
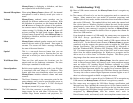
Step 1: Create the 16:9 Source Image
Prepare an image at 16:9 aspect ratio that is larger than 800x600. When
viewed with an image editor, the image will look normal, just really wide.
It should not appear stretched. It should appear as you want it to appear on
the 16:9 target display.
It is easy to check that an image is the correct size. If you take 16 and
divide it by 9, the result is 1.778 (I rounded up). A 16:9 aspect image
should yield 1.7778 when you divide the width by the height. If you run
the numbers and you don’t get a value that is within 0.01 of 1.778, you
need to crop the image so that the numbers come out correct.
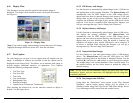
If the image dimensions are 16:9 and the image looks distorted at this step,
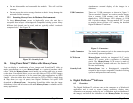
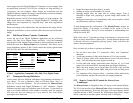
the final image will look distorted. Figure 34 shows a sample image that
has been cropped to exactly 16:9 aspect dimension.
Figure 34 - Original Image, 16:9 Aspect (2160x1215 pixels)
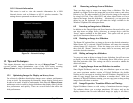
Step 2 : Scale to 800x600
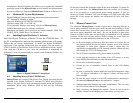
Using an image editing program, resize the image to 800 wide by 600
pixels tall. Your editing tool may have a checkbox to “constrains
proportions” or “preserve aspect ratio” as you scale the image… if so this
needs to be turned off. When complete, the image will look squished…
see Figure 35 for a comparison.
Figure 35 - Image Resized to 800x600
Copyright© 2006 Digital Spectrum Solutions, Inc. Page 11
Note: Once the MemoryFrame USB driver is installed the “Digital
Spectrum MemoryFrame” USB device will be listed as an “Imaging
Device” in the imaging devices section of the Windows® Device
Manager.
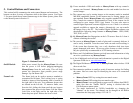
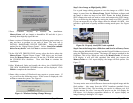
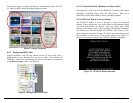
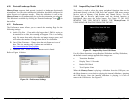
6.5 Building Slideshows
Digital PixMaster lets you create a complete slideshow of images for
download to the MemoryFrame. The PC does not need to be connected to
the MemoryFrame to create slideshows; only to transfer. To start Digital
PixMaster™ double click on the Digital PixMaster icon. By default,
Digital PixMaster™ will open an empty slideshow template. See Figure 7.
Figure 7 – Digital PixMasterTemplate
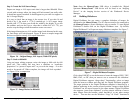
Click either INSERT or use the browser to locate the images (JPEG, TIFF,
BMP, PNG, or GIF) that you want to use as content for the slideshow.
Digital PixMaster supports “drag-n-drop” functionality; select an image
from the browser window and drag into the Digital PixMaster template.
The target position in the Digital PixMaster template is identified by a
shadow appearing in the current selected position. Images within Digital
PixMaster can be moved around in the same manner. Digital PixMaster
also supports “paste from clipboard,” to allow simple selection of one or
more images from the Internet, email, hard-drive, or any other storage
device. You can also use the Windows “Copy” & “Paste” functions to