


Installation and Configuration Manual 41
Maintenance and Fault Finding
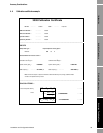
SpecificationMaintenance and Fault Finding
4. Gently rest the 3098 specific gravity meter on its side and undo the six M6 bolts that lock the
base plate to the reference chamber.
Note: Care must be taken not to bend or damage the three gas pipelines that originate from the base
plate.
5. The diaphragm is exposed once the base plate has been removed.
6. As the diaphragm is a single-moulded piece part, servicing consists of either changing the
sealing O-ring or changing the diaphragm itself.
5.4.4 Re-assembly procedure
1. Invert the 3098 specific gravity meter so that the diaphragm counter-bore faces upwards.
2. Locate the diaphragm assembly into the counter-bore housed in the welded assembly–not the
base plate.
3. Carefully replace the base plate over the diaphragm, making sure that the diaphragm is not
moved from its central position in the counter-bore and that the connectors line up for the two
‘base-to-top-plate’ gas pipelines.
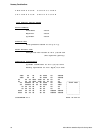
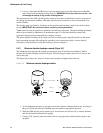
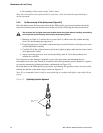
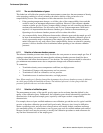
4. Place the bolts into their counter-bores and tighten them in ascending order as shown in the
diagram below:
Figure 5-4 Order to tighten bolts in counter-bores
5. Replace the two ‘base-to-top-plate’ gas pipelines and the density meter (if it has been
removed) and perform a leak check on all seals described in Section 5.4.7.
6. The 3098 specific gravity meter can now be replaced in the main enclosure, by reversing the
procedure described for Main meter (3098 specific gravity meter) removal (Figure 5-1).
5.4.5 3098 specific gravity meter filter change procedure
1. Remove unit from installation and enclosure as described in Section 5.4.1.
2. Place the unit on its side and loosen the fittings that retain the input gas interconnection pipe.
3. Once this pipe has been removed, loosen and remove the filter fitting that screws into the unit
base plate.
4. The filter element cannot be removed from its housing, so the complete fitting must be
changed.
5. The new filter should be inserted into the base plate, using PTFE tape to produce a gas tight
seal. Care should be taken to ensure that no stray parts of PTFE tape fall into the instrument.
1
3
5
2
4
6