


Model G0757Z (Mfd. Since 02/15)
-25-
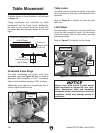
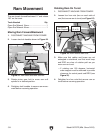
Power Feed Test Run
The mill comes with a power feed unit for X-axis
table travel. Proper operation of the limit switch
attached to the front middle of the table is criti-
cal for the safe use of this power feed unit. If the
power feed does not operate as expected during
the following steps, disconnect it from power and
contact our Tech Support at (570) 546-9663 for
assistance.
To test power feed:
1. Make sure all tools, cables, and other items
are well clear of table movement as you fol-
low these steps.
2. Refer to X-axis Power Feed identification on
Page 6 to understand how power feed, table
locks, and limit switch function.
3. Loosen X-axis table locks on front of table.
4. Make sure power feed directional lever is
in neutral (middle) position, turn speed dial
counterclockwise to lowest setting, then turn
power feed ON.
5. Move direction knob to left, slowly rotate
speed dial clockwise to increase speed, then
confirm table is moving left.
6. Watch for table limit stop to hit limit switch
and turn power feed OFF, stopping table
movement.
7. Move direction knob through neutral (middle)
position and all the way right. Table should
begin moving right.
8. Confirm table stops moving when limit stop
presses against limit switch plunger.
9. Move direction knob to neutral (middle) posi-
tion, turn speed dial counterclockwise to low-
est setting, and turn power feed OFF.
Congratulations! The Test Run of the mill is
complete. Continue to the next page to per-
form the Spindle Break-In and Inspections &
Adjustments procedures.
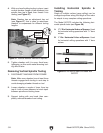
Spindle Break-In
The spindle break-in procedure distributes lubri-
cation
throughout the bearings to
reduce the risk
of early
bearing failure
if there are any "dry" spots
or areas where lubrication has settled in the bear-
ings. You
must complete this procedure before
placing
operational loads on the spindle for the
first time when the machine is new or if it has
been sitting idle for longer than 6 months.
Always start the spindle break-in at the lowest
speed to minimize wear if there
are dry spots.
Allow the spindle to run long enough to warm up
and distribute the bearing grease, then incremen-
tally increase spindle speeds and repeat this pro-
cess at each speed until reaching the maximum
spindle speed. Following the break-in procedure
in this progressive manner helps minimize any
potential wear that could occur before lubrication
is fully distributed.
DO NOT perform this procedure indepen-
dently of Test Run section. Mill could be
seriously damaged if controls are set differ-
ently than instructed in that section.
Complete spindle bearing break-in proce-
dure to prevent rapid wear and tear of
spindle components once mill is placed into
operation.
1. Run vertical spindle at 100 RPM for 10
minutes (see Page 35 for details on how to
change speeds).
2. Reverse spindle rotation direction and run
spindle for an additional 10 minutes.
3. Run spindle for 5 minutes in each direction of
spindle rotation at the following speeds: 250,
500, 1000, 1500, and 2000 RPM. Make sure
to only increase speeds in the order shown.
Vertical Spindle Break-In