


Page 40
Page 40
After agreeing to the messaging policy, you will need to enter a Nick name in the
top text box of the profile dialog box. This is how your name will be displayed in
the Contacts list and when you send messages to other users. This is the only
obligatory entry, so you can remain totally discreet. The rest of the information
is optional and you may enter as much or as little as you choose.
At the bottom of the dialog box are your Privacy options. If you wish to be
seen by other users, make sure that the Allow others to contact me box is
ticked. If you do not wish to be seen make sure that there is no tick in the box.
If you do tick it, you will then be able to enter details under Optional details.
You can add the following:
Actual name, Email address, Age, Investment approach (type of trader you are),
Investment Horizon (long or short term), Years with ShareScope, Years Investing,
and Other (any additional information you may wish to enter).
Under the Privacy options, there is a second option Allow others to know
if I am connected. If this is ticked, ShareScope will let other on-line users
know that you are connected to the intraday feed and are therefore available
for messaging.
The final option is Alert me to incoming messages. Once selected this will
alert you to any incoming messages the moment you receive them by displaying
a dialog box. The dialog box will tell you who the message is from, what the
subject is and gives you the option to read the message or ignore it.
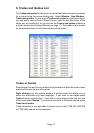
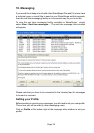
Adding Contacts
Before sending messages, you will need to update your contacts list. To do
this, click on the Contacts button at the bottom right of the message inbox
dialog box.
In this dialog box, you should see a list of nicknames on the left hand side.
These are all the ShareScope users who are currently connected and ready to
use messaging. If you highlight any of the users listed, you will see the user
profile appear on the right-hand side.
If you would like to send a message to any of these users, first highlight the
name of the relevant user. Then using the radio buttons at the bottom right of
the contact list dialog box select Include on my send list. Repeat this for as
many users as required. Once you have added all the users you want, close
down the contacts list.
Sending Messages
Click on Compose at the bottom left of the message inbox dialog box to open
a new message. From the compose message window, use the To: drop-down
menu to select the user you wish to contact. Please note that ShareScope
support, ShareScope administration and ShareScope wishlist are
automatically included on this list so you can contact us easily. Underneath
the default ShareScope addresses are the users you have added from your
contacts list.