


G0501 Sliding Table Saw -43-
Crosscutting full size panels:
1. Mount the crosscut table to the sliding table.
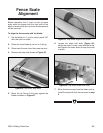
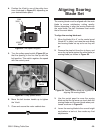
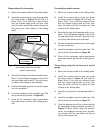
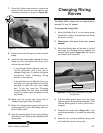
2. Install the crosscut fence in the forward guide
pin holes shown in Figure 72 and lock it in
place. Note—First, drop the crosscut fence
into the outside edge guide pin hole, then
drop the other end of the crosscut fence into
the guide pine hole closest to the sliding
table.
Figure 72. Guide pin holes used when mounting
the crosscut fence for full size
panel crosscutting.
3. Set either flip stop to the desired width-of-cut.
Note—If the workpiece extends to the left of
the saw blade more than 66", then the cross-
cut fence slide needs to be extended.
4. Position the blade guard to the correct height
for your workpiece.
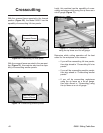
6. Load the workpiece onto the table saw. The
set up should look similar to Figure 69.
7. Once all the necessary safety precautions
have been taken, perform the cutting opera-
tion.
Forward Guide
Pin Holes
Rear Guide
Pin Holes
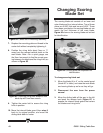
Crosscutting smaller panels:
1. Mount the crosscut table to the sliding table.
2. Install the crosscut fence in the rear guide
pin holes shown in Figure 72 and lock it in
place. Note—First, drop the crosscut fence
into the outside edge guide pin hole, then
drop the other end into the guide pin hole
closest to the sliding table.
3. Set either flip stop to the desired width-of-cut.
Note—If the workpiece extends to the left of
the saw blade more than 66", then the cross-
cut fence slide needs to be extended.
4. Position the blade guard to the correct height
for your workpiece.
5. Load the workpiece onto the table saw. The
set up should look similar to Figure 69.
6. Once all the necessary safety precautions
have been taken, perform the cutting opera-
tion.
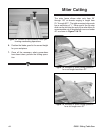
Crosscutting using the rip fence as a cut-off
gauge:
1. Mount the crosscut table to the sliding table.
2. Install the crosscut fence in the rear guide
pin holes shown in Figure 72 and lock it in
place. Note—First, drop the crosscut fence
into the outside edge guide pin hole, then
drop the other end into the guide pin hole
closest to the sliding table.
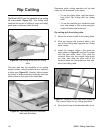
3. Position the rip fence to the desired width-of-
cut.
4. Load the workpiece onto the table saw. The
set up should look similar to Figure 71.
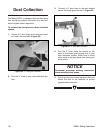
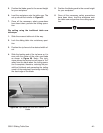
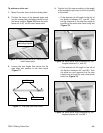
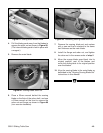
5. Slide the leading end of the rip fence behind
the back edge of the workpiece as shown in
Figure 73. Note—When using the crosscut
fence, the workpiece should never be mak-
ing contact with the saw blade and the rip
fence at the same time.