


Page 35SKU 96067
For technical questions, please call 1-800-444-3353.
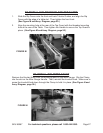
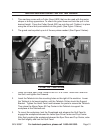
TO ADJUST THE SAW TABLE’S 45 DEGREE STOP
Loosen the Trunnion Handle and move the Table toward 45 degrees.
Push on the Auto Stop Pin. If the Table does not stop at 45 degrees, move the
Table back toward 0 to allow room to adjust the 45 Degree Stop Pin.
Make a slight adjustment to the Stopscrew and recheck the Stop. Repeat this
procedure until it stops at exactly 45 degrees.
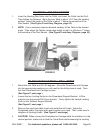
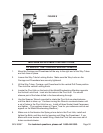
TO ALIGN THE MITER GAUGE
Place the Miter Gauge in the Table Slot closest to the Saw Blade.
Place a T-Square against the face of the Miter Gauge and the Saw Blade with the
high spot at the top of the Blade.
Loosen the Miter Gauge Handle. Then move the face of the Miter Gauge so the
T-Square’s edges are ush against the Miter Gauge and Saw Blade.
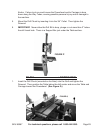
Use a screwdriver to reset the pointer to 0 degrees.
Pull the Stop Rod out and use a screwdriver to adjust the Stop Rod to 0 degrees.
To set the Miter Gauge at 45 degrees, pull out the Stop Rod and rotate the Miter
Gauge face 45 degrees. Then place the 45 degree angle between the Miter
Gauge face and Saw Blade.
When both angle edges are ush with the Miter Gauge face and Saw Blade
adjust the 45 Degree Setscrew.
Place the Miter Gauge in the channel facing the opposite direction. To set
another 45 degree stop, repeat Steps #6 and #7.
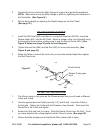
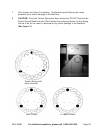
TO ALIGN THE EXTENSION TABLE 90 DEGREES TO THE SAW BLADE
Remove the saw Table from the Carriage. Move the Carriage and Powerhead all
the way to the right.
Install the Extension Table with the top just above the Saw Blade Arbor. Then
tighten the Handle Clamp.
Place the Miter Gauge in the Table Slot. Hold a pencil against the face of the
Miter Gauge while touching the face of the Saw Blade. As you rotate the Saw
Blade, the high spot will push the pencil away. Mark the high spot with chalk or a
felt marker.
1.
2.
3.
1.
2.
3.
4.
5.
6.
7.
8.
1.
2.
3.