


CHAPTER 17
Maintenance and Troubleshooting
224 DL.3 Digital Light User Manual
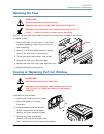
5. Clean the front window using a mild glass cleaner (containing no ammonia) and a soft, lint-
free cotton cloth.
6. If the window needs replacement, use the part specified in “Related Products and
Accessories” on page 1-4.
7. Carefully replace the Phillips screws and washers, making sure not to break the glass.
8. Reconnect power to the infrared illuminator
9. Replace the front bezel.
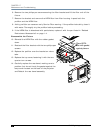
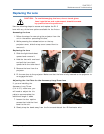
Replacing Motor Driver Boards
The DL.3 fixture is designed with two motor driver boards:
1. The board that controls the motors for the tilt, focus, zoom, and iris functions as well as
fans is located in the fixture head.
2. The board that drives pan motor and fans is located in the base housing.
All cabling is marked with labels corresponding to locations on board for easy replacement.
When changing a board, align the screw holes and standoffs to ensure correct orientation in the
fixture.
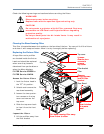
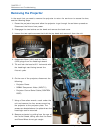
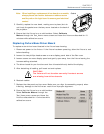
Fixture Head Driver Board
To replace the fixture head driver board:
1. Disconnect power to the fixture and allow it to cool.
2. Unlatch the two rear latches and remove the rear bezel.
3. Use a 3mm allen wrench to remove the addressing screws and star washers.
4. Position new board against module aligning the center top standoff. Place contact screw(s)
in the appropriate position.
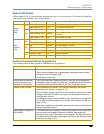
CAUTION!
Use plastic washers only when replacing the front
glass. Using metal washers can damage the glass.
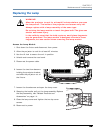
WARNINGS!
Disconnect power before servicing.
Replace fuses with the specified type and rating only.
Equipment surfaces may reach temperatures up to
130° C (266° F). Allow the fixture to cool before
handling.
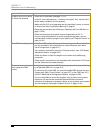
CAUTION!
The fixture will not function correctly if contact screws
are missing from driver boards.