


IMPORTANT
CAUTION
IMPORTANT
IMPORTANT
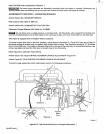
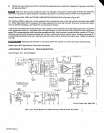
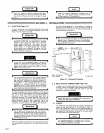
1.
Loosen
the
linkage
nuts
(6
&
8)
and
remove
the
hardware
(10)
securing
the
linkage
socket
(9)
to
the
governor.
Rotate
thelinkage
socket
(9)
until
the
throttle
stop
plate
(2)
is
about
1/32
inch
from
the
stop
(1).
A
clockwise
rotation
of
the
linkage
socket
(9)
will
shorten
the
governor
linkage
(7)
and
reduce
the
gap;
a
counterclockwise
rotation
of
the
linkage
socket
(9)
will
lengthen
the
governor
linkage
(7)
and
widen
the
gap.
(In
some
cases
it
may
be
necessary
to
adjust
the
linkage
itself
to
obtain
the
1/32
inch
gap
required.)
Tighten
the
linkage
socket
nuts
(6
&
8)
to
lock
the
position
of
the
linkage
sockets
(5
&
9).
______________
Check
the
linkage
(7J
for
freedom
of
movement
throughout
its
entire
travel.
If
the
linkage
is
binding
due
to
the
linkage
socket
nuts
(5
&
9)
being
out
of
proper
alignment,
loosen
the
linkage
socket
nuts
(6
&
8)
and
rotate
the
sockets
(5
&
9)
slightly
until
unrestricted
movement
of
the
linkage
(7)
is
restored.
Tighten
the
linkage
socket
nuts
(6&8).
Ensure
that
body
limbs
are
clear
of
the
fan
and
the
vacuum
motor
unit
before
starting
or
working
on
the
~.
engine.
-------
--------~
----
-
-
-:~-~
-
2.
Recheck
all
adjustments
made
thus
far.
Place
the
IDLE
CONTROL
switch
in
the
LOCK
OUT
position.
Start
the
engine
and
allow
it
to
reach
normal
operating
temperature
(about
five
minutes).
Ensure
that
the
CHOKE
control
is
pushed
fully
in
at
this
time.
-
3.
Pull
the
arm
(3)
toward
the
front
of
the
welding
generator
to
the
idle
position.
Maintain
pressure
on
the
arm
(3)
to
butt
against
the
idle
screw
(4)
throughout
the
following
adjustments:
A.
Rotate
the
idle
screw
(4)
to
obtain
550
rpm.
Clockwise
rotation
of
the
screw
(4)
will
increase
engine
rpm,
whereas
counterclockwise
rotation
of
the
screw
(4)
will
decrease
engine
rpm.
B.
Rotate
the
idle
mixture
adjustment
screw
(20)
counterclockwise
until
the
engine
begins
to
falter
or
roll;
then
rotate
the
screw
(20)
clockwise
until
the
engine
operates
smoothly.
Rotating
the
screw
(20)
clockwise
restricts
the
fuel
flow,
making
the
air-fuel
mixture
leaner.
Rotating
the
screw
(20)
counterclockwise
admits
more
fuel,
making
the
air-fuel
mixture
richer.
Ensure
that
the
vacuum
motor
idle
screw
(16)
butts
against
the
vacuum
motor
unit
mounting
plate
BEFORE
the
throttle
stop
plate
(2)
butts
against
the
idle
screw
(4)
prior
to
p/acing
the
IDLE
CONTROL
switch
in
the
AUTOMA
TIC
IDLE
position.
To
obtain
this
condition
it
may
be
necessary
to
adjust
screw
(16).
Check
by
manually
pivoting
the
vacuum
motor
arm
(17)
until
screw
(16)
butts
against
the
mounting
plate.
4.
Place
the
IDLE
CONTROL
switch
in
the
AUTOMATIC
IDLE
position.
Operation
of
the
idling
device
is
automatic
when
the
IDLE
CONTROL
switch
is
in
the
AUTOMATIC
IDLE
position.
When
the
engine
is
running,
engine
rpm
will
remain
at
idle
until
an
arc
is
established,
at
which
time the
engine
immediately
comes
up
to
weld
rpm.
When
the
arc
is
broken,
a
time
delay
will
exist
before
the
engine
begins
to
return
to
idle
rpm.
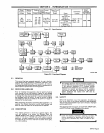
The
length
of
this
time
delay
is
controlled
by
the
setting
of
the
time-delay
screw
A
in
Figure
9-7.
If
the
engine
does
not
go
to
idle
rpm
after
about
ten
seconds,
adjust
the
time-delay
screw
(A)
for
the
desired
time
delay.
This
screw
is
located
on
the
vacuum
line
fitting
going
into
the
intake
manifold
of
the
engine.~
5.
When
the
engine
has
gone
to
idle
rpm,
adjust
screw
(16)
until
1200
rpm
is
obtained.
I~EIi11~
Do
not
readjust
the
idle
rpm
screw
(4)
when
adjusting
the
vacuum
motor
idle
rpm.
-
______________
Check
the
linkage
(19)
for
freedom
of
movement
throughout
its
entire
travel.
If
the
linkage
is
binding
due
to
the
linkage
socket
(18)
being
outof
proper
alignment
with
the
fixed
end,
adjust
the
tength
of
the
linkage.
It
will-
then
be
necessary
to
readjust
the
vacuum
motor
idle
screw
(16)
and
repeat
Steps
4
and
5.
Is~..tU.I
I
~
~
Ensure
that
body
limbs
are
clear
of
the
fan
and
the
vacuum
motor
unit
before
working
on
the
engine.
6.
Place
the
IDLE
CONTROL
switch
in
the
LOCK
OUT
position.
Loosen
the
governor
speed
adjusting
screw
secur
ing
nut
(11).
Adjust
the.governor
speed
adjustment
screw
(12)
until
a
high
idle
rpm
of
1850
is
obtained.
Tighten
the
securing
nut
(11)
to
maintain
the
governor
speed
setting.
7.
Check
the
governor
engine
regulation
by
applying
and
removing
the
engine
load.
If
a
governor
sensitivity
adjust
ment
is
deemed
necessary,
loosen
one
of
the
two
locking
nuts
(13)
and
proceed
with
the
following
instructions:
A.
IF
REGULATION
RANGE
IS
TOO
BROAD
-
Decrease
the
governor
spring
(15)
tension
by
sliding
the
sen
sitivity
adjustment
screw
(14)
inward.
B.
IF
REGULATION
RANGE
IS
TOO
NARROW
-
Increase
the
governor
spring
(15)
tension
by
sliding
the
sen
sitivity
adjustment
screw
(14)
outward.
C.
IF
ENGINE
SURGES
(HUNTS)
UNDER
LOAD
Increase
the
governor
spring
(15)
tension
by
sliding
the
sen
sitivity
adjustment
screw
(14)
outward.
-~
-