


RUSKA 7350
Users Manual
3-2
W Caution
If there is any condensation, the RUSKA 7350 must be
thoroughly dried before power is applied.
Cautions
The following cautions should be heeded at all times to insure safe operation of the
RUSKA 7350.
WX Warning
Never operate the unit with the cover removed. The power
supply has internal voltages near 400 volts.
Never apply more than 110% of the unit’s full scale pressure range to the test port. Never
try to control while a pressure source is connected to the test port.
Avoid thermal and mechanical shock to the instrument. This will affect performance and
require re-zeroing.
Powering Up the RUSKA 7350
1. First, plug the power cord supplied with the RUSKA 7350 into the power connector
on the RUSKA 7350’s back panel.
Note
Grounding for the RUSKA 7350 is provided through the power cord.
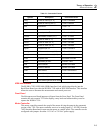
2. Next, plug the power cord into a receptacle rated for either 100 – 120 VAC
or 220 – 240 VAC (check name plate). If a different power cord is necessary for your
receptacle, consult Table 1-1 for available power cords.
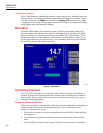
3. Finally, turn on the RUSKA 7350 by flipping the POWER switch on the back panel.
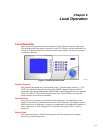
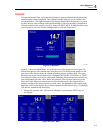
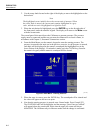
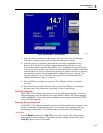
The MEASURE screen will appear on the color display, and the front panel will be
fully operational.
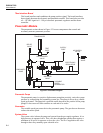
Pneumatic Connections
Pneumatic connection to the RUSKA 7350 is straightforward. The following sections
discuss each port.
Drive Air Supply Port
The air supply port must be connected to a well regulated source of dry shop air.
Air supply should be 100 – 110 psi (7 – 7.5 bar). Supply port is a 1/4 NPT female
connection.
Test Port
The test port is designed to control a wide range of volumes. Any leaks on the test port
will cause measurement errors. For best results, a volume of approximately 3 in
3
(50 cc)
is recommended. The test port is 1/8 NPT female.
Gas Supply Port
The gas supply port should be connected to a clean, dry gas supply with a pressure of
110% of full scale pressure. The port is 1/8 NPT female.