


IPS Custom
FortiGate-100A Administration Guide 01-28007-0068-20041203 283
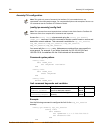
Adding custom signatures
To add a custom signature
1 Go to IPS > Signature > Custom.
2 Select Create New to add a new custom signature or select the Edit icon to edit an
existing custom signature.
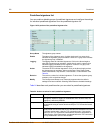
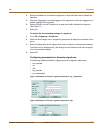
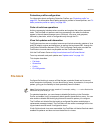
Figure 148:Edit custom signature
3 Enter a name for the custom signature.
You cannot edit the name of an existing custom signature.
4 Enter the custom signature.
5 Select the action to be taken when a packet triggers this signature. (See Table 24 for
action descriptions.)
6 Select the Logging box to enable logging for the custom signature or clear the Logging
box to disable logging for the custom signature.
Backing up and restoring custom signature files
For information on backing up and restoring the custom signature list, see “Backing up
and Restoring” on page 116.
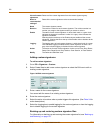
Clear all custom
signatures
Remove all the custom signatures from the custom signature group.
Reset to
recommended
settings?
Reset all the custom signatures to the recommended settings.
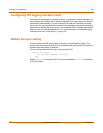
Name The custom signature names.
Revision The revision number for each custom signature. The revision number is a
number you assign to the signature when you create or revise it.
Enable The status of each custom signature. A white check mark in a green circle
indicates the signature is enabled. A white X in a grey circle indicates the
signature is disabled.
Selecting the box at the top of the Enable column enables all the custom
signatures. Clearing the box at the top of the Enable column disables all the
custom signatures.
Logging The logging status of each custom signature. A white check mark in a green
circle indicates logging is enabled for the custom signature. A white X in a
grey circle indicates logging is disabled for the custom signature.
Action The action set for each custom signature. Action can be Pass, Drop, Reset,
Reset Client, Reset Server, Drop Session, Clear Session, or Pass Session.
Modify The Delete and Edit/View icons.