


-30-
Model G0763 (Mfg. Since 8/13)
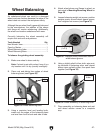
Wheel Dressing
Superior grinding results can only be achieved
with a properly balanced and dressed wheel.
Do not assume that a wheel will run true on the
spindle if it is new or has not been separated from
the sleeve and flange.
IMPORTANT: Balance wheel, as instructed on
Page 27, before dressing it.
Dressing the wheel correctly will save you from
wasting grinding abrasive and shattering the
dressing tool diamond. Additionally, with a prop-
erly balanced and dressed wheel you can rest
assured that if you have finish problems, the
grinding wheel is not the culprit.
Depending on the finish required, varying degrees
of roughness can be obtained. For example: A
fast dressing at a depth of 0.03mm will prepare
a wheel surface for rough cuts; or a slow dress-
ing with multiple light passes of the diamond at a
depth of 0.01mm will prepare the same wheel for
finish cuts.
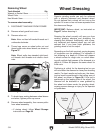
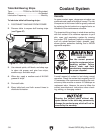
Positioning is critical for the dressing tool so you
will not shatter the diamond or have poor dressing
results. For best results and safe use, the dress-
ing tool must be positioned in the trailing zone of
the wheel, as shown in Figure 38. If the tool is
positioned on the leading side of the wheel, the
diamond will be shattered or even grabbed by
the wheel and drawn under the grinding wheel,
causing severe damage or injury to the operator
or bystanders.
YES
NO
Rotation
Grinding
Wheel
Dressing
Tool
Magnetic Chuck
Figure 38. Wheel dressing setup.
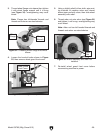
Removing Wheel
Tools Needed Qty
Wrench or Socket 19mm ................................... 1
Wheel Puller ...................................................... 1
Hex Wrench 5mm .............................................. 1
To remove wheel assembly:
1. DISCONNECT MACHINE FROM POWER!
2. Remove wheel guard front cover.
3. Remove arbor nut.
Note: Arbor nut has left-handed threads so it
unthreads clockwise.
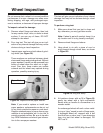
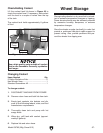
4. Thread cap screw on wheel puller out and
thread puller onto wheel sleeve, as shown in
Figure 37.
Note: Wheel puller has standard right-hand-
ed threads and threads onto sleeve clock-
wise.
5. To break taper mating between wheel sleeve
and arbor, tighten puller cap screw.
6. Remove wheel assembly, then remove puller
from wheel assembly.
— If storing wheel, follow Wheel Storage
instructions on Page 38.
Figure 37. Using wheel puller.
Wheel
Puller