


-32-
Model G0763 (Mfg. Since 8/13)
3. Rotate both speed controls knobs all the way
counterclockwise. This will prevent power
feeds from starting table movement when
power feed unit is turned ON.
4. Reconnect machine to power.
5. Position grinding wheel above workpiece
without making contact. This position will be
used to test run limit stop setup.
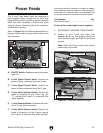
6. Select automatic operation by turning X-axis
mode selector switch to the right (pointing at
“table” symbol).
7. Turn X-axis speed control knob clockwise to
slowly begin table travel.
8. Make sure grinding wheel travels desired dis-
tance over workpiece in X-axis.
— If grinding wheel does not travel desired
distance over workpiece, rotate X-axis
speed control knob all the way counter-
clockwise to stop table travel, then reposi-
tion X-axis limit stops.
To prevent damage to power feed unit,
ONLY stop table travel by rotating speed
control knobs all the way counterclockwise.
Do NOT use ON/OFF switch or mode selec-
tor switches to stop table travel.
9. Stop X-axis table travel by rotating X-axis
speed control all the way counterclockwise.
10. Hold Y-axis mode selector all the way to left
(pointing at “T” symbol) to jog Y-axis table
movement, and make sure grinding wheel
travels the desired distance over workpiece
in the Y-axis.
— If grinding wheel does not travel the desired
distance over workpiece, rotate Y-axis
mode selector to the center (pointing at
“hand” symbol), then reposition Y-axis limit
stops.
11. Using the Z-axis handwheel, lower grinding
wheel until it just touches the highest point of
workpiece surface.
Note: Better results are attained with multiple
light passes than a few deep passes.
12. Start coolant flow and grinding wheel rota-
tion.
13. With both mode selector switches rotated to
the right (pointing at “table” symbol), rotate
the speed control knobs to the desired table
travel speed.
Note: When table completes one side-to-side
cycle in X-axis path, then table will travel for
a short time along the Y-axis path and stop.
The distance the table travels along Y-axis
path depends upon setting of Y-axis speed
control knob.
You can reverse Y-axis direction any time by
pushing the Y-axis reverse button.
14. Allow the grinding wheel to surface the
desired workpiece surface until there are no
more sparks generated before lowering the
grinding wheel with Z-axis crank for addi-
tional surfacing.
Do NOT leave machine unattended when
operating in power feed mode to prevent
an unexpected occurrence from damag-
ing machine/workpiece or causing a safety
hazard.