


Turn-On Checkout 21
3
Turn-On Checkout
Introduction
Note This chapter provides a preliminary introduction to the power supply front panel. See Chapter 5 - "Front Panel"
for more details.
Successful tests in this chapter provide a high degree of confidence that the power supply is operating properly. For
verification tests, see Appendix C - "Operation Verification”. Complete performance tests are given in the service manual.
Do not apply ac power to the power supply until told to do so.
Preliminary Checkout
1. Make certain that the front panel switch is off.
2. Examine the Line Voltage Rating or Line And Fuse Rating label (see Chapter 2 - "Installation" )
Verify that the line voltage rating agrees with your power source. If it does not, see Appendix E - "Line Voltage
Conversion".
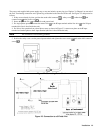
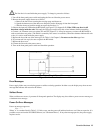
3. Check the sense wiring as follows:
Remove the output safety cover and examine the output sense terminals. They should be wired for local sensing as
follows:
1. The +LS sense terminal wired to the +S terminal of the analog connector.
2. The –LS sense terminal wired to the –S terminal of the analog connector.
3. If the power supply is not wired for local sensing, make the above connections, using small-capacity wire
(AWG #22 is sufficient).
4. Make sure that there is no load connected to the output terminals or bus bars.
Power-On Checkout
1. Connect the power cord to the power supply .
2. Turn the front panel power switch to ON (1).
3. The power supply undergoes a self-test when you turn it on. If the test is normal, the following sequence appears on
the LCD:
The GPIB address (factory default is 5).
This is then followed by PWR ON INIT for approximately 10 seconds.
4. The display then goes into the meter mode with the Dis annunciator on and all others off. “Meter mode” means that
the VOLTS digits indicate the output voltage and the AMPS digits indicate the output current. These values will be
at or near zero.
5. Verify that the power supply fan is on by placing your hand near the rear grill to feel the air flow. You may also be
able to hear the fan operating.
6. Press
once. The Dis annunciator will go off and the CV annunciator will go on .
Note If the power supply detects an error during self-test, the display will show an error message. Go to “In Case of
Trouble” at the end of this chapter.