


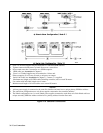


40 Front Panel Operation
Programming The Output
Important These instructions show how to program a single power supply. There are special considerations when
you have two or more supplies connected in series or in autoparallel. See "Chapter 4 - User Connections
and Considerations".
The power supply accepts values directly in volts and amperes. Values will be rounded off to the nearest multiple of the
output resolution (see “Programming Resolution" in Table A-2). If you attempt to enter a value not in a valid range, the unit
will either switch to the other range or the entry will be ignored and OUT OF RANGE appears on the display.
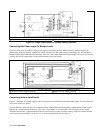
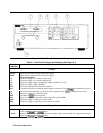
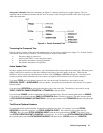
Figure 1-1 shows the general response of the E4356A power supply. Unless directed otherwise, always keep the output
voltage and current within the boundaries of its operating line for the specified mode of operation (CV or CC).
Establishing Initial Conditions
Set the power supply to its *RST state by pressing
. This state was stored in location 0 at the factory. If it
has since been changed, you can restore it as directed under “Turn-on Conditions”, later in this chapter. *RST results in the
following operating conditions:
■ Zero voltage output.
■ Minimal current output.
■ Output disabled (Dis annunciator on).
■ Overcurrent protection off (OCP annunciator off).
■ Protection circuits cleared (Prot annunciator off).
■ Overvoltage protection set to maximum.
Programming Voltage
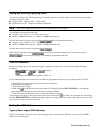
To program the output for 45 volts, proceed as follows:
■ Press . The display will change from meter mode to indicate VOLTS.
■ Press . If you discover a mistake before pressing , erase the incorrect value with the
key.
■ The display will return to the meter mode and indicate 0.000 volts.
■ Press
to enable the output (Dis annunciator turns off). The VOLTS display will indicate 45.00 volts.
Note The power supply must be programmed for a minimal current in order to increase the output voltage
beyond zero. Normally, there is sufficient idle current to do this. If the power supply does not respond or
the CC annunciator turns on, go to “Programming Current” and set the current to a small value.
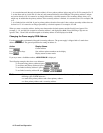
■ Now raise the voltage by pressing .Note that the voltage increases by a specific increment (depending on the
voltage programming resolution) each time you press the key and increases rapidly as you hold down the key. To lower
the voltage, press
.
■ Try raising and lowering the voltage by rotating the Voltage control clockwise and then counterclockwise. Note how the
output responds as compared to using the Entry keys.
■ Try to program a voltage greater than the V
MAX
for your unit (see Table A-2). Note that the display shows OUT OF
RANGE.
Programming Overvoltage Protection
Overvoltage protection guards the load against voltages that reach a specified value above the programmed output voltage.