


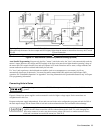

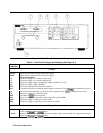

Front Panel Operation 41
Setting the OVP Level. Assuming that you have programmed the power supply for 45 volts, you can set the OVP level to
48 volts as follows:
■ Press . The display will change from meter mode to indicate 0V, followed by the present OVP value.
■ Press .
■ The display will return to the meter mode and indicate the output (45.00 volts).
■ Press again. The display will now indicate 0V 48.00.
■ Press to return to the meter mode.
Checking OVP Operation. Assuming the above operating conditions (voltage programmed to 45 V and OVP
programmed to 48 V), trip the OVP circuit as follows:
■ Gradually increase the output voltage by pressing until the OVP circuit trips. This will cause the output
voltage to drop to zero and the Prot annunciator to go on.
■ There now is no power supply output due to an overvoltage condition.
■ To verify this, press and observe that the display indicates 0V. This shows that the protection circuit tripped
due to an overvoltage condition.
Clearing The OVP Condition. With the OVP tripped, return to the meter mode and try to clear the condition by pressing
. Nothing will appear to happen because the OV trip voltage is still below the programmed output voltage. Thus,
as soon as the circuit is cleared, it trips again. You can clear the OV condition by:
■ Lowering the output voltage below 48 (the OV setting), or
■ By raising the OV trip voltage above the output voltage setting.
Try either of these methods. Now when you press
, the Prot annunciator will turn off and the output voltage will
return to normal.
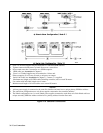
Programming Current
You may program the power supply current without a load, but must have a load in order to draw output current. These tests
assume you have the load connected in accordance with the information in Chapter 4. If you do not have a load on the
power supply, you may connect a short across the output terminals as described in Chapter 3.
The example will program a low current. (You may later increase the output current to the levels you will expect to use.) To
program the output current to 1.3 amperes, proceed as follows:
■ Disable the output by pressing . The Dis annunciator will turn on.
■ Program the voltage by pressing .
■ Press . The display will change from meter mode to indicate AMPS.
■ Press . If you discover a mistake before pressing erase the incorrect value with the backspace
key
.
■ The display will return to the meter mode and indicate up to 0 . 000.
■ Press to enable the output. Dis will turn off and the display will indicate VOLTS 5 . 000 AMPS 1. 300.
■ Now increase the current by pressing . Note that the current increases by a specific increment (depending on
the current programming resolution) each time you press the key and increases rapidly as you hold down the key. To
decrease the current, press
.
■ Try increasing and decreasing the current by rotating the Current knob clockwise and counterclockwise. Note how the
output responds as compared to using the Entry keys.
■ Disable the output by pressing . The Dis annunciator will turn on. Now try to program a current greater
than the I
MAX
for your unit. Note that the display shows OUT OF RANGE.