


-30-
&.D#=2?.A6<;@
?<D;!<916;4BE696.?F2;02
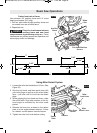
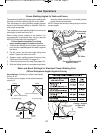
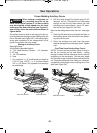
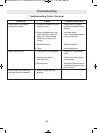
Small Cut-off Piece Stationary Fence
Auxiliary FenceSmall Cut-off Piece
*52;:.86;4.0<:=<B;10BA
<;.:<916;49F6;439.A<;A52
A./92;.??<D0BA<33=6202@<?92@@6;D61A5
:.F/2=?<=29921.A5645@=221<C2?A5232;02
.;1/2F<;1A52/.08<3A52A<<9@2264B?2
(@2.BE696.?F32;02.@6;@A?B0A21.;1@5<D;6;
364B?2@/29<D
An auxiliary fence is used to add support to the cut-
off workpiece such as large crown molding when cut
flat on the table (see Figure 42). It will reduce splin-
tering and movement of the unsupported cut-off
piece of wood after the cut is made.
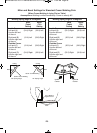
!.86;4.;BE696.?F2;02
Required pieces:
Wood Board (described below)
4 – Flat Head Machine Screws – 1/4" diameter;
2-1/2" long
4 – 1/4" Flat Washers
4 – Nuts
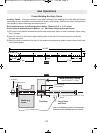
1. Cut a nominal 1" x 2" wood board to a length of
21-3/14" long. NOTE: 1 x 2" nominal equals
3/4" x 1-1/2" actual. 3/4" plywood cut to size may
be substituted.
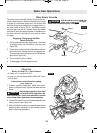
2. Drill four holes through the board using a 5/16"
diameter drill bit. Countersink the holes deep
enough so that the flat head screws will rest
below the front work surface – use a 1/2" diam-
eter drill bit (see Figure 43, 44 & 45).
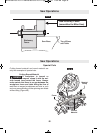
Remove the sliding fences from the tool – see page
21.
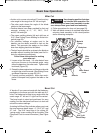
1. Place the flat head screws through the holes in
the auxiliary fence, then the holes in the station-
ary fence on the tool.
2. Place the washers and nuts over the screw
threads and against the stationary fence. Tighten
nuts.
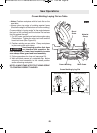
6?@A'6:2(@2<3A52BE696.?F2;02
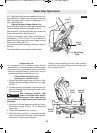
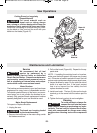
NOTE: The first time the auxiliary fence is used, it
will be cut through by the saw blade – cutting
through creates minimal clearance which reduces
splintering on the workpiece. Set the miter angle
and the bevel angle required before making the first
cut. Clamp the workpiece, then make cut – example:
compound cutting large crown molding flat on the
table (see Figure 39).
FIG. 41 FIG. 42
!
WARNING
BM 2610021316 10-11 E:BM 2610021316 10-11 E.qxp 10/17/11 11:02 AM Page 30