


7. USING CF CARDS
48
BAS-300G, BAS-311G, BAS-326G
7-3. Data read/write mode
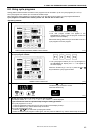
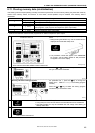
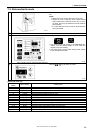
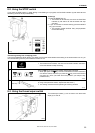
1
With the power turned off, insert the CF card into the CF
slot.
NOTE:
• Make sure the CF card is facing the correct way.
• Always be sure to keep the cover closed except
when inserting and removing the CF card. If this is
not done, dust may get inside and cause problems
with operation.
• If no valid data can be found, the CF media indicator
will not illuminate.
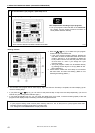
2
Turn on the power switch.
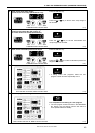
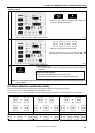
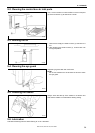
3
Switch to data read/write mode.
TEST indicator and CF media indicator illuminate
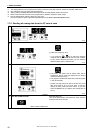
While pressing the TEST key, press the R/W key.
• The mode number will appear in the PROGRAM No.
display, and the setting details for that mode will
appear in the menu display.
• The initial mode is sewing data reading mode. (Refer
to the read/write mode list)
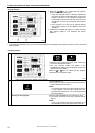
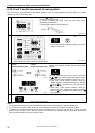
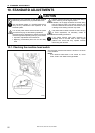
4
Press the
or key to select the mode.
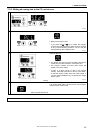
[Read/write mode list]
PROGRAM No.
display
Menu display Setting items
r 1 [-SEd] Sewing data is read from the CF card. (*1)
w 2 [SEd-] Sewing data is written to the CF card.
r 3 [-MEM] Memory switch settings are read from the CF card.
w 4 [MEM-] Memory switch settings are written to the CF card.
r 5 [-UPG] User programs are read from the CF card.
w 6 [UPG-] User programs are written to the CF card.
r 7 [-SyS] Control programs are read from the CF card and used to update the firmware version.
w 8 [LoG-] Error log data is written to the CF card.
r 9 [-Fdd] Sewing data is read from the floppy disk. (*2) (*3)
w 10 [Fdd-] Sewing data is written to the floppy disk. (*2)
r 11 [-EoP] Expansion option output (*4) data is read from the CF card.
w 12 [EoP-] Expansion option output data is written to the CF card.
r 13 [oPFd] Expansion option output data is read from the floppy disk. (*2)
r 14 [-EoP] Expansion option output data for older models is read from the CF card. (*5)
(Continued on next page)
4453Q
4574Q
4575Q