


308584 19
Operation
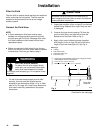
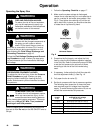
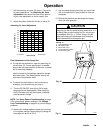
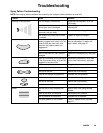
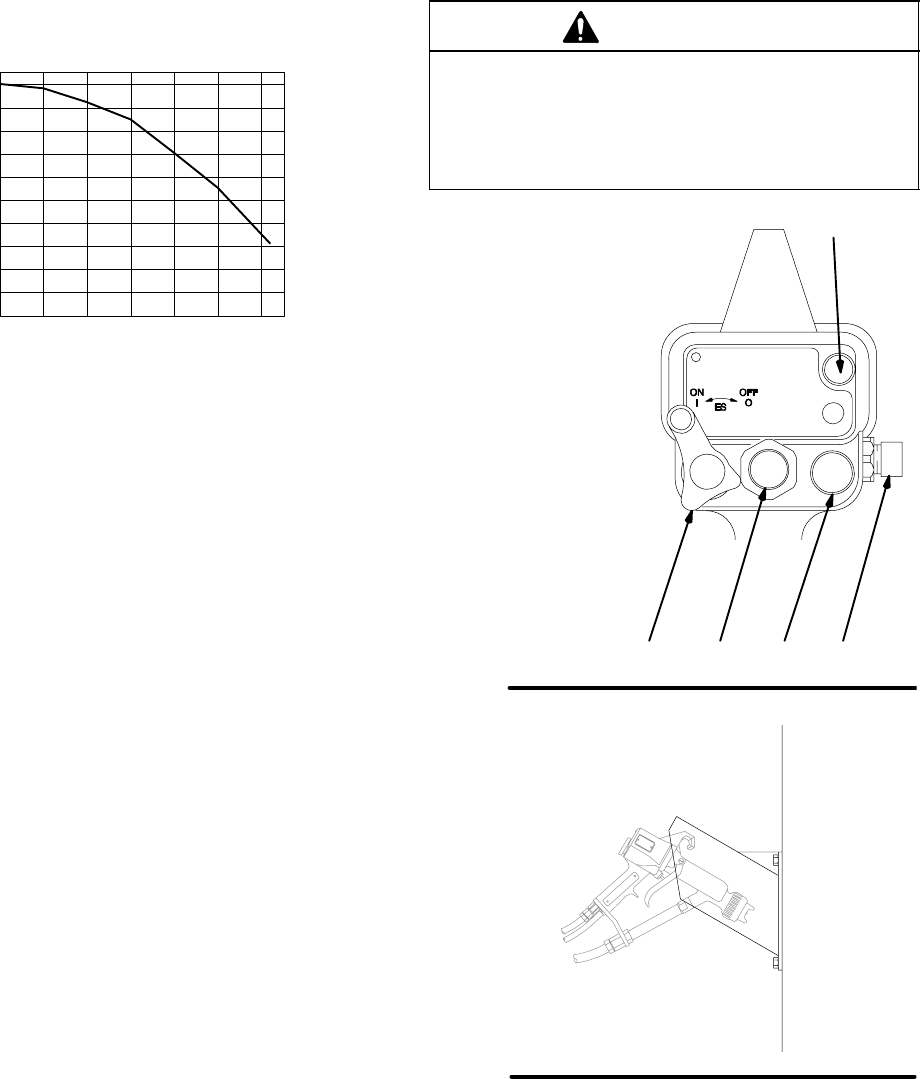
7. Set the atomizing air valve (R) about 1.5 turns out
for most applications. The Atomizing Air Valve
Adjustment chart shows the effect of the atomiz-
ing air valve adjustment on the air cap air flow.
8. Adjust the pattern width with the fan air valve (P).
Atomizing Air Valve Adjustment
0
10
20
30
40
50
60
70
80
90
100
0.00 0.50 1.00 1.50 2.00 2.50 3.00
Air Cap Air Flow (%)
Valve Turns
Fully Open Fully Closed
Fine Adjustments of the Spray Gun
D To improve the atomization, open the atomizing air
valve further (R). If more atomizing air is needed
beyond the fully open position of the valve, increase
the air hose inlet pressure.
Use the lowest air flow settings needed for accept-
able atomization. The slower particle velocity will
improve the electrostatic effect.
D To reduce the atomization air and minimize any
overspray, turn the atomizing air valve in.
9. Turn the ES ON-OFF lever (N) to ON to begin
spraying with the electrostatics. When spraying,
the ES indicator light (M) should glow, indicating
the electrostatic charge.
NOTE: See Spray Pattern Troubleshooting on page
25 to correct spray pattern problems. See Voltage
Loss Troubleshooting on page 22 to correct voltage
problems.
10. Operate the voltage isolation system as instructed
in the system manual. Normal spraying voltage for
the system will be 45 to 55 kV.
11. Use the same spraying technique you would use
with a conventional air spray system to coat the
workpiece.
12. Relieve the pressure and discharge the voltage
when you stop spraying.
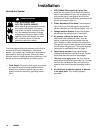
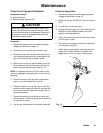
CAUTION
Hang the gun with its nozzle pointing down when it is
not being used to avoid having fluid run into the gun
air passages. See Fig. 11. Fluid in the gun air pas-
sages can cause poor atomization and excessive
current demands and damage the gun.
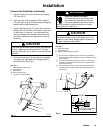
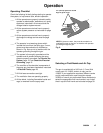
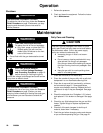
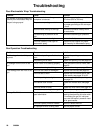
Fig. 10
05151A
P*N R
M
J
KEY-Fig. 10
J Fluid Adjustment Knob
M ES Indicator Light
N ES ON-OFF Lever
P Fan Air Adjustment Valve
R Atomizing Air Valve
Fig. 11
05424