


308584 21
Maintenance
Clean the Air Cap and Fluid Nozzle
Equipment needed:
D Soft bristle brush
D Non-flammable cleaning fluid
CAUTION
Do not use metal tools to clean the air cap or fluid
nozzle holes as this could scratch them, and make
sure the electrode wire is not damaged. Scratches in
the air cap or nozzle or a damaged electrode wire
can distort the spray pattern.
Procedure:
1. Relieve the pressure and discharge the system
voltage as instructed on page 16.
2. Remove the air cap retaining nut and air cap.
3. Clean the air cap with the soft bristle brush and a
non-flammable cleaning fluid or submerge the air
cap in the cleaning fluid and wipe it clean.
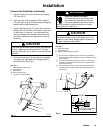
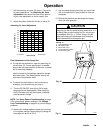
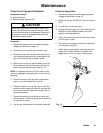
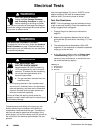
4. With the front of the gun pointed down, clean the
fluid nozzle and the front of the gun with the soft
bristle brush and cleaning fluid. See Fig. 12.
NOTE: If it appears that there is fluid inside the fluid
nozzle air passages, remove the gun from the line for
servicing.
5. Clean the exterior of the gun with a cloth damp-
ened in a non-flammable cleaning fluid.
6. Carefully install the air cap. Be sure to insert the
electrode wire through the center air cap hole and
do not bend the wire. Rotate the air cap horns to
the desired position.
7. Tighten the retaining nut until the air cap is held
firmly in place; you should not be able to rotate the
air cap horns by hand.
8. Test the gun resistance as instructed on page 28.
Flush the Spray Gun
1. Relieve the pressure and discharge the system
voltage as instructed on page 16.
2. Make sure the gun ES ON-OFF lever is turned to
OFF.
3. Turn off the air to the spray gun.
4. Change the fluid supply over to the cleaning fluid.
Read the voltage isolation system manual for
specific flushing procedures.
5. Spray the cleaning fluid until the fluid that comes
out of the gun is clear.
6. Shut off the fluid supply and relieve the pressure
as instructed on page 16.
7. Before spraying paint again, reconnect the paint
supply, turn on the fluid and air supplies, and
trigger the gun until it is clear of cleaning fluid.
Fig. 12
05152A