


Section VIII - Power$ync II
™
Operation
48 Quincy Compressor
®
- QSD™
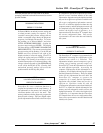
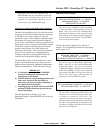
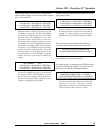
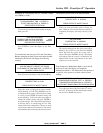
NETWORK SEQUENCE SETUP
SEQUENCE NUMBER TO CHANGE ➔ ____
PRESS ENTER TO ACCEPT VALUE
Before setting or changing a sequence, read
Network Setup (page 37). Press the UP or DOWN
arrow keys to change the sequence number
selected. Press ENTER to select the sequence
number indicated and move to the edit display.
Having sequence changes planned and
documented will aid in evaluating future changes
and maximize power savings.
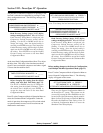
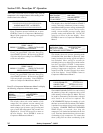
When ENTER is pressed to accept a sequence number,
the following edit display will appear:
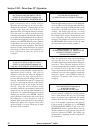
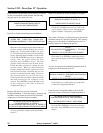
SEQUENCE: _____ NETWORK DATA: ______
1 > A 2 > B 3 > C 4 > - 5 > - 6 > -
UP/DOWN POSITION, F1 EDIT, ENTER RETURN
This display will immediately indicate which
sequence is ready to be edited. The machine ID
letter in the first position will be flashing at a fast
rate and the model designation of that machine
will be displayed in NETWORK DATA:. There
are six position numbers that can be used in a
sequence. This corresponds to the maximum
number of compressors that can be networked
together. Press the UP key once to cause the
machine ID letter in the first position to stop
flashing and cause the machine ID letter in the
second position to start flashing. All positions can
be accessed to make changes or additions by using
the UP or DOWN arrow keys. Press F1 to edit the
desired position.
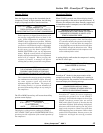
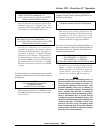
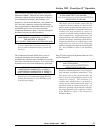
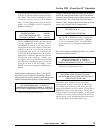
SEQUENCE: ______ NETWORK DATA: ______
1 > A 2 > B 3 > C 4 > -5 > -6 > -
UP/DOWN MACHINE ID, ENTER RETURN
When the position number of the machine to be
changed is flashing at a fast rate, press F1 to
change the rate at which the machine ID letter
flashes to a slower rate. This indicates that
changes can be made to that particular position
number. Use the UP or DOWN arrow keys to
select the machine ID. Once the proper machine
ID has been selected, press ENTER to accept. The
machine ID just selected will again flash at a rapid
rate. This indicates that the control is ready to be
moved to the next position number with the UP or
DOWN arrow keys. This process is repeated until
all positions are correct.
NOTE
When a compressor machine ID is already
assigned to a sequence position, it cannot be
assigned to another position without generating
a fault warning message. If, for example, machine
‘A’ is assigned to position ‘4’, you cannot assign
machine ‘A’ to position ‘1’ without first removing
it from position ‘4’. When editing the machine
ID for a particular position, the UP arrow key
will scroll through the alphabet in ascending
order. The DOWN arrow key will scroll in
descending order. The alphabet contains a dash
before the letter ‘A’. The dash indicates that there
is no compressor assigned to that position. In the
above example, change position ‘4’ to a dash
before assigning machine ‘A’ to position ‘1’.
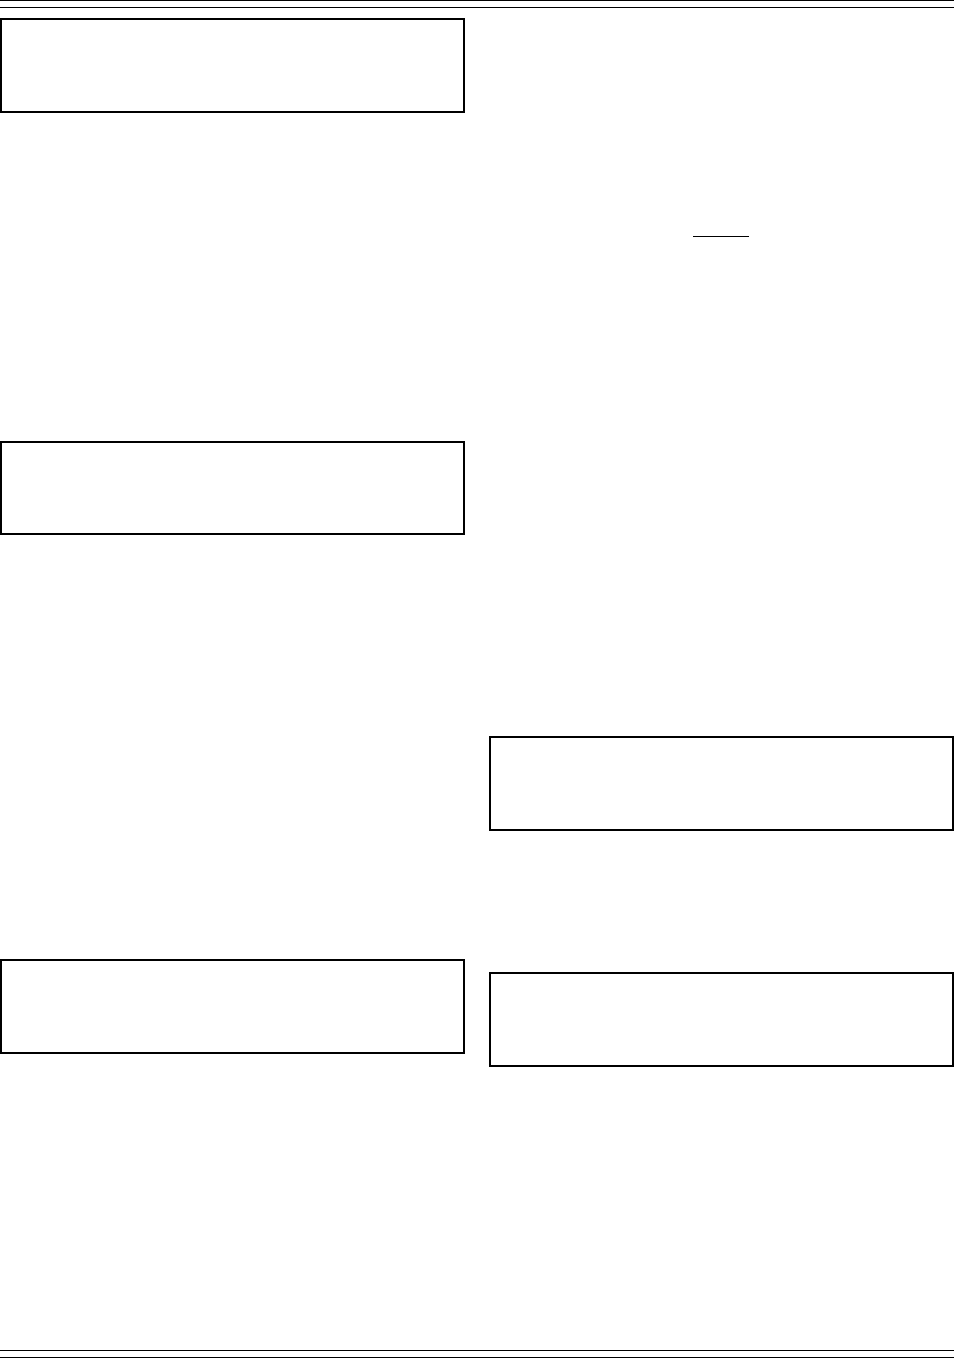
If an operator tries to assign the same machine ID letter
to two positions, the following fault message will be
displayed:
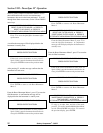
YOU HAVE USED THE SAME MACHINE TWICE
PLEASE PRESS ENTER TO CONTINUE EDIT
To change schedule information, press F2 at Network
Configuration Menu 2. The first portion of the schedule
that will be available to change is the day of the week.
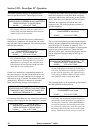
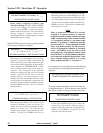
NETWORK SCHEDULE SETUP
DAY TO CHANGE ➔ MONDAY
PRESS ENTER TO ACCEPT VALUE
Use the UP or DOWN arrow keys to scroll to the
proper day of the week for which a change is
required. When the correct day is flashing in the
display, press ENTER to accept the day and
proceed to the schedule menu.