


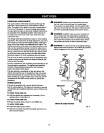
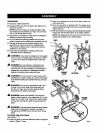
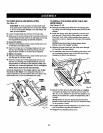
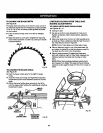

TOCHECKSAWBLADEINSTALLATION
See Figure 18.
CAUTION: Towork:properly,the saw blade teeth
must pointdown toward thefrontoft'nesaw.Failure
to do so could cause damage to thesaw blade,the
saw, ortheworkpisce.
• Lowerthe saw blade and remove the throat p_te.
• Make surethe bevel Locking lever issecurelypushed to
the left. Raise the saw blade to its fu[I height by turning
the height/bevel adjusting hsndwheel clockwise.
To Loosen the blade.
• Using';hesmall bladewrench, place theflat openand
on the fiats on the arbor shat'_.
• Insertthe closed end of the large blade wrenchover
the hexnut Holdingbothwrenchesfirmly, pull the
largerwrenchforward to the front of the machine.
To *dghtenthe blade:
• Usingthe srnaflbradswrench, placethe flatopenend
(rite the _(atson the arbor shaft.
• Inserttheclosed end of the largebladewrenchover
the hex nut.Holdingbothwrenchesfirmly,pushthe
{argerwrench to the back ofthe machine.Make sure
the blade nut issecurelytightened. Do notovsrtighten.
NOTE: Arbor shaft has left hand threads.
Check all clearancesfor free bladerotation.See ToSet
the Scale to the Blade in theAdjustmentSection. In
cutting operations,the scalewil}beset to the sideof the
bladewhere the cut willbe measured and made.
THROAT
PLATE
SMALL
WRENCH
LARGE
BLADE O
WRENCH
Fig. 18
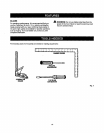
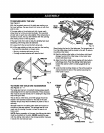
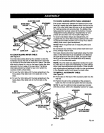
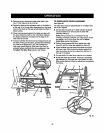
TO INSTALL THE SLIDING MITER TABLE AND
MITER FENCE
See Figures fg- 20,
• Removethe slidingrofter table from the storagearea
by pullingthe miter lockingclampsaway from thesaw
¢ablnst
• Installtheslidingmitertable assembly overthe front
and rear rails. Checkthat itslides easilyon the rsi[s.
Push both frontmiter looking clamps down evenlyon
eachsideto secure, Repeat for bothrear miter locking
_arnps.
NOTE: Do not force miter look}rig clamps down.
Tightenonlyto f_t "seated" position.
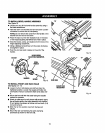
• Remove themiter fence from themiter fence storage
onthe side ofthe saw cabinet.
• To installthemiterfence tothe slidingmiter table, Ices-
en theadjustingclamp knobso the bolt hasenough
olsaranoa to slide _nthe table slot,
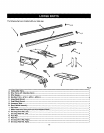
LOCKINGCLAMPS
REAR
RAIL
SUDII_
MITER
TABt.EBASE
Fig. 19
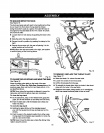
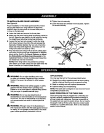
Mount the miter fenceto the mitertable by installing
the locater pin(belowthe miter fence) into holes=A",
"B", =C",or "D". (Holes"A" and =D" areclosest1othe
b}ade).Atthe same time, placethe attachment bolt in
thes_ot.
NOTE: Holes =A" and "D"shouldbe used for short
pieces of wood and holes"B" and "C" shouldbe used
for long piecesof wood.
• Property a_}ustthe miter indicatorto the scale on the
end ofthe fence oppositethe locater pin.
• Retightantheadiustingctarnp knob.
2O