


& WARNING: "1"oreduce the r_k of injury, always
make surethe ripfence isparalleltothe b_adebefore
b_innfng any opar_t'_o_.
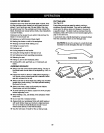
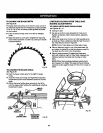
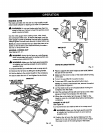
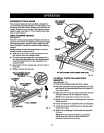
TO SET THE RIP FENCE SCALE INDICATOR TO
THE BLADE
See Figure37.
Use the following stepsto set the ripfence scale indicator
to the blade. Beginwith the blade at a zero angle(sVaight
up).
• Unplugthesaw.
• Loosen the ripfence by depressing the lock and lifting
the rooking handle.
• Using s framingsquare, set the rip fence 2 in. from the
bride tipedge.
• Loosenthe screw on the scale indicator.
• Tightenthe screw and checkthe dimensionand the rip
fence.
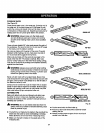
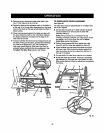
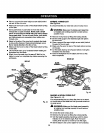
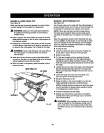
TO USE THE RIP FENCE
Figure38.
• Place the mar lip on the rear of the saw table and pull
slighttytoward thefront ofthe unit.
• Lower the front end of the rip fence onto the guide
surfacesontop ofthe front rail.
• Pushthe ripfence lever down to automaticaflyalign and
securethe fence.
Cheek fora smoothglidingaction. If adjustmentsare
needed, see To Check the Alignment of the Rip Fence
to the Blade in the Adjusfrnenfsectionofthis manual.
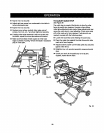
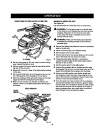
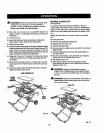
TO USE THE MITER GAUGE
See F=Jgure39.
The miter gauge providesgreateraccuracyin angHd cuts.
Forveryclose tolerances, test cutsare recommended.
Them aretwo miter gaugechannels,one on eitherside
of the blade.When maldng a 90° crosscut, you can use
either miter gauge channel.When makinga beveledcross
cut (thebladetilted in relationto the table)the miter gauge
sheutdbe locatedin the slot on the right so that the blade
istiltedaway from the miter gauge and yourhands.
The miter gauge can be turned60° to the rightor left.
• Loosenthe lock knob.
• With the miter gauge inthe miter gauge slot,rotate the
gaugeuntilthe desired angteisreached on the scale.
• Retightenthe lock knob.
BLADE
E
INDICATOR
2 in.
MARl(
LOCKING RiPFENCE
LEVER
SAW
RiP
FENCE SCALE
LOCKING RA]L
LEVER
Fig. 37
RE_ L|P
Fig.38
LOCK
MITER
GAUGE
Fig.39