


16
ENGLISH
Lock screw of the track arm loos-
ened.
Cutting the work piece:
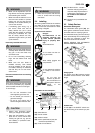
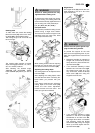
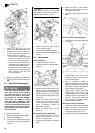
1. Loosen the lock screw (49) of the
rotating table (48).
2. Turn the rotating table (48) to either
the right or left to desired angle.
3
Note:
The rotating table has preset
stops and engages at the 0°, 15°, 22.5°,
30°, 45°, and 60° positions.
3. Once you have found your desired
angle, TIGHTEN THE ROTATING
TABLE LOCK SCREW (49), before
starting to cut, even if you are
using one of the preset stops (0°,
15°, 22.5°, 30°, 45°, or 60°).
4. Hold the work piece against the
fence.
5. Press and hold the ON/OFF switch .
6. Slowly swing the sawhead assembly
all the way down, holding the handle
firmly. When sawing exert only mod-
erate pressure. This keeps the
motor speed from dropping.
7. For wider work pieces pull sawhead
assembly forward
(towards the
operator).
8. Cut work piece in a single pass.
9. Release the ON/OFF switch and let
the sawhead slowly return to its
upper starting position.
8.3 Bevel cuts
3
Note:
A bevel cut cuts the work piece at
an angle other than 90°.
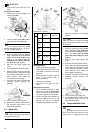
Maximum work piece cross section
(dimensions in inches):
Starting position:
Sawhead assembly fully raised.
Cutting depth limit screw set to max-
imum depth. Limit screw is securely
tightened.
Rotating table in
0° position, the lock
screw of the rotating table is
securely tightened.
Track arm not extended.
Lock screw of the track arm loos-
ened.
Cutting the work piece:
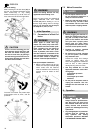
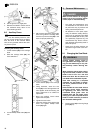
1. If the sawhead assembly is tilted
between 22.5° and 48° to the right:
loosen the Ph
illips head screw and
swing the hinged fence to the rear.
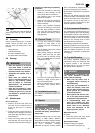
2. Loosen the sawhead assembly tilt
lock lever (50) at the rear of the
machine so that the sawhead
assembly can be tilted to the
side.
3. Grip the handle and slowly tilt the
sawhead assembly to the desired
position.
3
Note:
The track arm holder has preset
stops and engages at the 0°, 22.5°, and
45° positions.
4. Once you have found your desired
angle, TIGHTEN THE SAWHEAD
TILT LOCK LEVER (50)before start-
ing to cut, even if you are using
one of the preset stops (0°, 22.5°
or 45°).
5. Hold the work piece against the
fence.
6. Press and hold the ON/OFF switch .
7. Slowly swing the sawhead assembly
all the way down, holding the handle
firmly. When sawing exert only mod-
erate pressure. This keeps the
motor speed from dropping.
8. For wider work pieces pull sawhead
assembly forward (towards
the
operator).
9. Cut work piece in a single pass.
10. Release the ON/OFF switch and let
the sawhead slowly return to its
upper starting position.
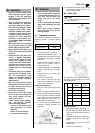
8.4 Compound Miter Cuts
3
Note:
A compound miter cut is a combi-
nation of the miter and bevel cuts. This
means that in a single pass the work
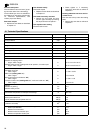
48 49
Width
approx.
Height
approx.
Angle of sawhead assembly
22.5°
left
11 7/32 2 3/4
22.5°
right
11 7/32 2 9/16
45 °
left
11 7/32 2 1/8
45 °
right
11 7/32 1
48 °
left
11 7/32 1 3/4
48 °
right
11 7/32 13/16
50