


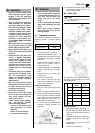

19
ENGLISH
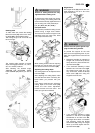
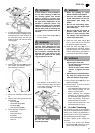
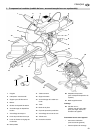
2. To keep the saw blade from turning,
pull the saw blade lock (59) forward,
towards the front of the machine. At
the same time slowly turn the saw
blade by hand, until the saw blade
lock engages.
3. Remove the arbor bolt (60) from the
saw spindle (left-handed thread –
turn clockwise to remove).
4. Swing the retractable blade guard
up.
5. Remove the following parts from the
saw spindle:
arbor bolt (60),
outer blade flange (61),
saw blade (62),
inner blade flange (63).
6. Clean clamping surfaces of:
saw spindle,
inner blade flange,
saw blade,
outer blade flange,
arbor nut.
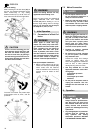
7. Put the inner blade flange
(63) on
the saw spindle.
8. Mount the new saw blade (62) and
pay attention to the direction. The
arrow on the saw blade must point
in the same di rection as the arrow
on the blade cover (66).
9. Install the outer
blade flange (61)
and be sure that the flat surfaces
are properly aligned and match.
10. Insert the arbor bolt (60), turn it
counterclockwise (left-hand thread)
and hand tighten with a metric Allen
wrench while keeping saw blade in
place
with the saw blade lock (59).
11. Swing flange guard (58) down an d
tighten screw (57).
12. Check function. To do so, lower the
sawhead assembly:
The retractable blade guard must
open without touching the saw
b
lade or any other parts.
When returning the sawhead
assembly to its starting position
the retractable blade guard must
return automatically so that the
entire saw blade is covered.
Check the saw blade lock – the
saw blade must turn freely.
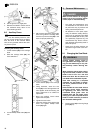
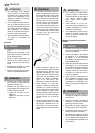
9.2 Drive Belt Tensioning
The drive belt, running on the right-hand
side of the sawhead assembly behind a
plastic cover, needs to be tightened if it
has more than a 1/8" of play if pressed in
the middle between the tw
o pulleys.
To check, tighten and/or change the
drive belt:
1. Loosen and remove the Phillips
head screw (68), unhook the cover
(hook at the rear) and remove it.
57
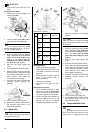
58
59
60 61 6362
A WARNING
If resin residue is to be removed or
for any other cleaning, do NOT use
any cleaning agents that contain
acids or caustic or corrosive sub-
stances which would tend to corrode
the light metal components of the
machine if splashing occurs. The
stability and safety of the machine
could be compromised if such sub-
stances were used for cleaning and
are inadvertently splashed onto the
machine.
A WARNING
Make sure the inner blade flange is
correctly fitted. Otherwise the saw
may jam or the saw blade may work
itself loose! The inner blade flange
(63) is correctly installed when the
bevelled collar (65) points to the
right and the groove for the safety
ring (64) points to the left.
A DANGER
Do not use blunt, damaged or
warped saw blades.
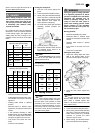
64 65
66
A WARNING
x Never use grinding or cut-off
wheels instead of saw blades.
x Use only saw blades approved
by the manufacturer. Do not use
super-speed steel (HSS) saw
blades.
x Do not use loose-fitting reduc-
tion rings; the saw blade could
work itself loose.
x Be sure that the saw blade is
properly fitted. Make sure the
blade it is firmly secured, does
not wobble, runs balanced and
cannot work itself loose.
A WARNING
x Do not use excessive force when
tightening the arbor bolt:
Do not extend your wrench to
get more leverage.
Do not hit your wrench with a
hammer to tighten the arbor
bolt.
x When tilting the sawhead assem-
bly, keep your hands out of the
track arm holder's tilting range!