


SC Series Instruction Manual page 61
Strain-Gage Input Channel10
10.3 Calibration Procedure
If you are not familiar with operating the instrument in the SETUP menu mode,
see “SETUP Menu mode” on page 23. A listing of all menu items is given in
“Setup Menu Reference” on page 157.
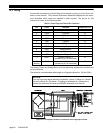
Step 1: Wire the transducer to the channel’s connector.
See “Wiring” on page 60 for details.
Step 2: Enter the
CALIBRATION TYPE
.
There are three methods that can be used to calibrate the transducer to the
Input Channel. Each has advantages and disadvantages as described in
“
CALIBRATION TYPE
Menu Item” on page 67. It is important to know your
application in order to select the appropriate calibration type.
Step 3: Enter the
CALIBRATION DATA.
If your transducer has Signature Calibration, you don’t need to enter these
values as they are entered automatically.
If your transducer was ordered and shipped along with the instrument, you
don’t need to enter these values as they have been entered at the factory.
Otherwise, consult the Certificate of Calibration for the transducer when
entering information in the
CALIBRATION DATA
sub-menu.
Step 4: Perform the calibration.
Otherwise, use the
CALIBRATE
menu item to start the calibration process. You
will be prompted to apply loads to the transducer as required.