C-2
ACCESSORIES
C-2
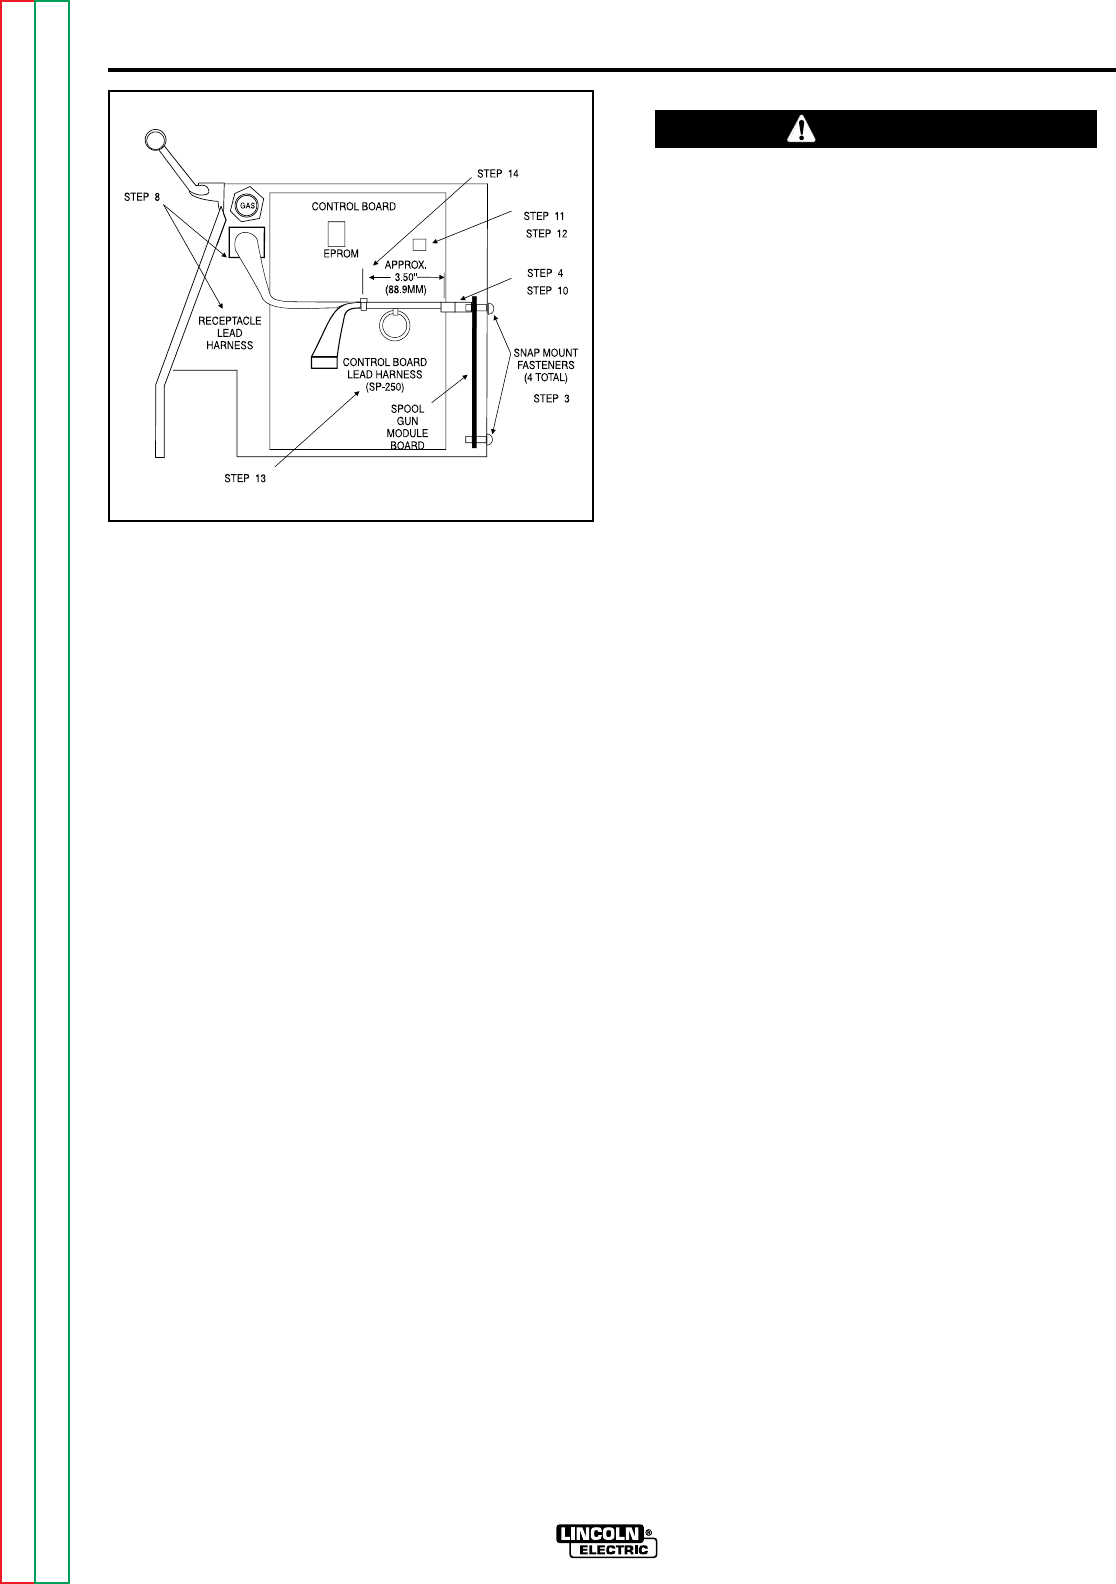
Figure C.2 - Spool Gun Module Board Installation.
1. Remove input power to the machine before start-
ing.
2. Remove the six screws that hold the Case Side
Panels.
3. Locate the four snap-mount fasteners mounted to
the side panel of the control Board.
4. Position the spool gun module board over the
snap-mount fasteners, making sure that the lead
plug connectors are placed at the top.
5. Gently press the board onto the fasteners, making
sure all of the fasteners snap into place.
6. On the wire drive side of the machine, remove the
hex-head screw from beneath the gas connector
releasing the metal cover. See Figure C-1.
7. Slide the metal cover out from behind the motor
bracket. Flip the cover over so that the screw hole
is in the top right corner, then reinstall as a spacer
plate with the hex head screw. See Figure C-1.
8. Find the panel receptacle lead harness included in
the kit. See Figure C-2. Insert the panel recepta-
cle into the hole from the control board side of the
panel, making sure that the panel receptacle
mounting plate is positioned so that the grounding
screw is in the lower left corner of the plate.
NOTE: For model codes below 9900, small notches
may need to be filed at top and bottom of panel hole to
clear the plastic mounting ears of the receptacle.
CAUTION: Collect metal filings with a rag to protect
against possible metal contamination of the control
board or other internal electrical components.
____________________________________
9. Fasten the panel receptacle to the case with the
three #6-32 x 3/8" self tapping screws provided.
Insert screws from wire drive side, through the
sheet metal, and into the receptacle mounting
plate holes.
10. Plug the 10-pin, 8-pin, and 6-pin connector plugs
from the other end of the receptacle lead harness
into the 10-, 8-and 6-pin connectors (J12, J11 and
J13) at the top of the spool gun module board.
Plug in the 8-pin connector at the opposite end of
this harness into the unused 8-pin connector on
the SP-250 control board (J4).
11. Disconnect the 4-pin gas solenoid plug from the
receptacle (J8) on the upper right corner of the
Control Board. See Figure C.2. Reconnect this
plug into the 4-pin receptacle (J14) on the top of
the Module Board.
12. Plug the 4-pin connector plug, included with the
panel receptacle harness connected in step 10
above, into the Control Board receptacle (J8), dis-
connected in step 11 above.
13. Using the cable tie included in the kit, tie the two
harnesses together approximately 3.50 inches
(88.9mm) from the end of the lead plugs as shown
in Figure C.2.
14. Replace the Case.
IDEALARC SP-250
Return to Section TOC Return to Section TOC Return to Section TOC Return to Section TOC
Return to Master TOC Return to Master TOC Return to Master TOC Return to Master TOC
CAUTION


