


TROUBLESHOOTING AND REPAIR
F-44F-44
LN-25™
REPAIR PROCEDURE
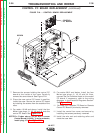
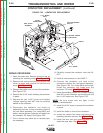
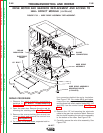
1. Open the case door. Remove the wire reel by
removing the retaining collar. See Figure F.5.
2. Remove the screws holding the control box
cover in place and remove the control box
cover. See Figure F.5.
NOTE
: If only the gas solenoid valve needs replacing,
it may not be necessary to disconnect all of the wiring.
Disconnect wiring only as needed.
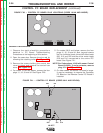
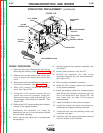
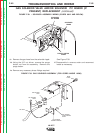
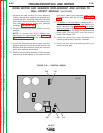
3. For codes 10148 thru 10500, remove plug J11
from the solenoid PC board. Also, disconnect
the two solenoid leads from the gas solenoid
valve, and disconnect the purge switch leads.
See Figure F.27.
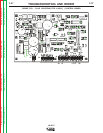
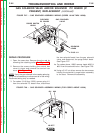
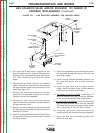
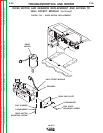
4a. For codes above 10500 remove leads #690 &
#691 from the solenoid valve. See Figure F.28.
4b. Using a 5/16” nut driver remove the two screws
holding the solenoid & purge button assembly
to the case. Remove the assembly.
GAS SOLENOID VALVE AND/OR SOLENOID PC BOARD (IF
PRESENT) REPLACEMENT (continued)
FIGURE F.27. – GAS SOLENOID ASSEMBLY WIRING (CODES 10148 THRU 10500).
SOLENOID
PC BOARD
GAS SOLENOID
VALVE
SOLENOID
LEADS
PLUG J11
PURGE SWITCH
LEADS
Return to Section TOC Return to Section TOC Return to Section TOC Return to Section TOC
Return to Master TOC Return to Master TOC Return to Master TOC Return to Master TOC
690
691
FIGURE F.28. – GAS SOLENOID ASSEMBLY WIRING (FOR CODES ABOVE 10500).