


POWER MIG 255
TROUBLESHOOTING & REPAIR
F-43 F-43
Return to Section TOC Return to Section TOC Return to Section TOC Return to Section TOC
Return to Master TOC Return to Master TOC Return to Master TOC Return to Master TOC
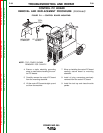
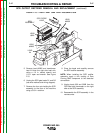
15. Grasp the motor/gearbox assembly and
wiggle the motor/gearbox assembly
gently back and forth until it separates
from the wire drive assembly.
16. Use a 7/16 in. nutdriver to remove the
hex head cap screws, lock washers,
and flat washers securing the wire
drive assembly to the wire drive
compartment.
17. Remove the wire drive assembly from
the wire drive compartment.
18. Reassemble the wire drive assembly in
the reverse order.
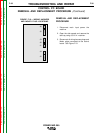
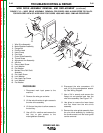
10. Rotate the adjustment arm assembly
counterclockwise to release the tension
on the idle arm.
11. Swing the idle arm up and away from
the wire drive assembly.
12. Use a screwdriver and remove the
round head screw, lock washer, and flat
washer securing the molded drive roll
shaft assembly to the wire drive assem-
bly.
13. Remove the molded drive roll shaft
assembly and the rest of the outer
guide assembly from the wire drive
assembly.
14. Use a screwdriver and remove the pan
head screws and lock washers secur-
ing the motor/gearbox assembly to the
wire drive assembly.
WIRE DRIVE ASSEMBLY REMOVAL AND REPLACEMENT (continued)