


P 21/ 30
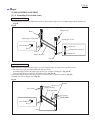
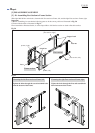
Repair
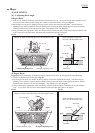
[4] ADJUSTMENT
[4] -2. Adjusting Miter Angle
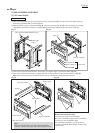
Fig. 56 Fig. 57
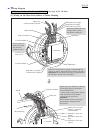
1) Lock the saw head unit in the full down position.
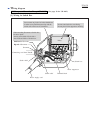
2) Slightly loosen four M6x20 hex socket head bolts that fasten the Arm section to Turn table. (Fig. 56)
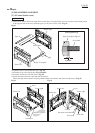
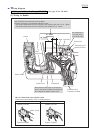
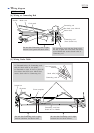
3) Lightly tighten one of the four bolts. Then, applying 90 degree set square (No.1R208) to the side of saw blade and
Guide fence, pivot the Arm section slightly on the tightened bolt until No.1R208 closely contacts the side of the saw
blade and Guide fence without gap between the surfaces. While keeping the 90 degree angle between the blade and
Guide fence, tighten four M6x20 hex socket head bolts securely. (Fig. 57)
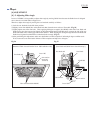
4) After performing this adjustment, make sure that Pointer on Table complete is indicating 0 degree on Miter scale.
If not, loosen the screw that fastens Pointer to Table complete and adjust it to 0 degree.
[Bottom of Table viewed from the Lever 100 installation side] [Saw blade and Guide fence viewed from top]
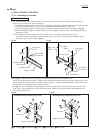
In case of LF1000, it is impossible to adjust miter angle by moving Guide fence because the Guide fence is designed
also as the axis on which Table is flipped over.
Therefore, adjust miter angle by moving the saw head unit carefully as follows:
Lever 100
Arm section
(Arm and
Sub arm)
Hex socket head bolt M6x20
Saw head unit
Saw head unit
Guide fence
No.1R208
Saw blade
Arm section
Lever 100