


10
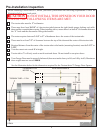
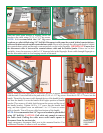
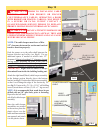
Once the cable guide bracket is aligned, secure the
bracket to the jamb, using (2) 1/4 x 1-1/2" lag screws.
NOTE: It is recommended that 1/4" lag screw
locations are pilot drilled using 1/8" drill bit. Disconnect cable must be routed behind counterbalance
cable and it must not rub on the counterbalance cable. Route cable through the cable guide bracket, behind
the counterbalance cable and through a convenient hole or slot in the flagangle. IMPORTANT! Ensure that
the disconnect cable is between the counterbalance cable and the header/jambs. If there isn’t a hole
available, it may be necessary to drill a 1/8" diameter hole in the flagangle. Route cable through flagangle so
that the disconnect cable is now hanging outside of the track.
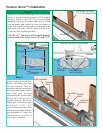
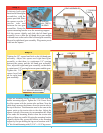
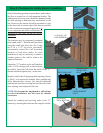
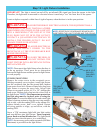
Mark a location on the right jamb, 6 feet above the floor to mount the handle bracket. Align top of the bracket
with the mark. Fasten bracket to the jamb with (2) 1/4 x 1-1/2" lag screws. Start the #6-20 x 1/2"screw into the
handle. Thread the disconnect cable through the top of the handle bracket
and then the handle. Locate the handle in full upper position of handle
bracket. Then remove all cable slack between the opener and the top of
the handle bracket. Tighten #6-20 x 1/2" screw into the handle until
snug, and then tighten screw an additional 1 to 1-1/2 turns to secure
cable to handle. Trim off excess cable from bottom of the handle.
NOTE: It is recommended that 1/4" lag screw location be pilot drilled
using 1/8" drill bit. CAUTION: Pull cable only enough to remove
the cable slack. Pulling the cable more could cause opener to
disconnect from the torsion tube.
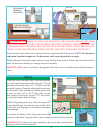
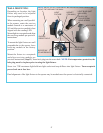
Apply emergency disconnect label next to the mounted bracket. Use
mechanical fasteners if adhesive will not adhere.
MOUNTED
BRACKET
EMERGENCY
DISCONNECT
LABEL
HANDLE
BRACKET
DISCONNECT
CABLE
#6-20 X 1/2”
SCREW
DISCONNECT
CABLE
FLAGANGLE
CABLE
GUIDE
BRACKET
DISCONNECT CABLE MUST
BE BETWEEN JAMBS/HEADER
AND COUNTERBALANCE
CABLE
HEADER
COUNTER
BALANCE CABLE
FLAGANGLE
1/4” X 1-1/2” LAG SCREW
6’ to
floor
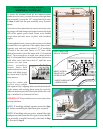
Step 7
OPENER
HANDLE
BRACKET
HANDLE