


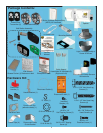
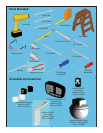
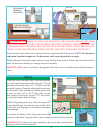
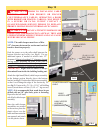

Attach the loose disconnect cable, from the hardware
kit, to the opener disconnect cable using the “S” hook
provided. Close both ends of the “S” hook to lock the
assembly together. Thread the cable guide bracket onto
the disconnect cable making sure that the proper hole
is used. For the 2-5/8" to 2-1/2” tube offset, use the
hole closest to the flange. For the 3-3/8" tube offset,
use the hole farthest from the flange.
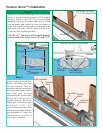
NOTE: Depending on the type of door the opener is
being installed onto, it may be necessary to drill a hole
in the right side flagangle for routing the disconnect
cable through.
First locate the flange of the cable guide bracket just
inside the cable drum. Align the cable so that it remains parallel to the torsion tube.
IMPORTANT! If cable is not aligned parallel to the torsion tube, the disconnect
operation will not function properly.
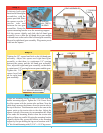
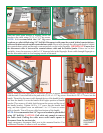
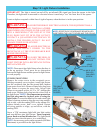
WARNING WHEN LEVELING THE OPENER TO THE TORSION TUBE DO NOT MAKE
ANY ADJUSTMENTS TO THE CENTER SPRING BRACKET ASSEMBLY. REMOVING ANY LAG
SCREWS HOLDING THE SPRING BRACKET TO THE WALL MAY RESULT IN SEVERE OR FATAL
INJURY. LEVEL THE OPENER BY SIMPLY MOVING THE UNIT UP OR DOWN VERTICALLY.
Pull on the disconnect cable that is located at the lower right hand side of the opener. NOTE: The disconnect
cable must be pulled straight out. The disconnect cable cannot be pulled at an angle.
While holding the disconnect cable rotate the motor into the down position. Release the disconnect cable to
allow the disconnect bearing to re-engage the motor assembly.
HELPFUL HINT: Insert a screwdriver through the cable loop, to use as a handle when pulling disconnect
cable.
9
FLAGANGLE
PARALLEL
CABLE DRUM
Step 6
“S” HOOK
CABLE GUIDE BRACKET
2-5/8” TO 2-1/2”
OFFSET
3-3/8”
OFFSET
DISCONNECT CABLE
MOTOR
DISCONNECT
BEARING
(ENGAGED)
CENTER SPRING
BRACKET ASSEMBLY
OPENER