


CHAPTER 4: Installing Components
26
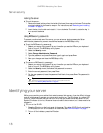
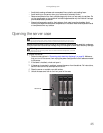
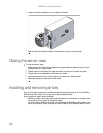
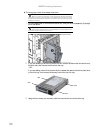
6 Loosen the two thumbscrews (1) on the back of the cover.
7 Slide the cover (2) toward the back of the case, then remove it from the case.
Closing the server case
To close the server case:
1 Make sure that all of the internal cables are arranged inside the case so they will not be
pinched when you close the case.
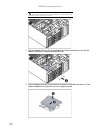
2 Place the cover on the side of the case, then slide it forward until it snaps into place.
3 Tighten the two thumbscrews to hold the cover in place.
4 Lock the case cover lock on the front panel of the case, then close the bezel.
5 Reconnect the power cords and all other cables.
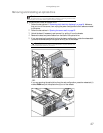
Installing and removing drives
Your server’s basic configuration includes one optical drive and as many as 10 3.5-inch SATA or
SAS hot-swap hard drives. You can also add an optional diskette drive.
As you prepare to install drives, remember:
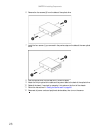
• Before you install a drive, see the drive’s documentation for information on configuring the
drive, setting drive jumpers, and attaching cables.
• You may need to configure the drives you install using the BIOS Setup utility. Restart your
server, then press F2 at any time after you see the LEDs on your keyboard flash or turn off.