


-38-
Model G0746/G0749 (Mfg. Since 3/13)
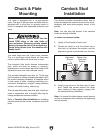
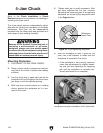
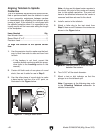
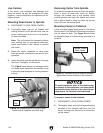
Figure 42. 4-jaw tightening sequence.
1
2
3
4
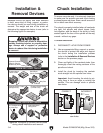
Workpiece
Center Point
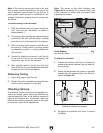
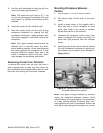
Figure 43. Generic picture of non-cylindrical
workpiece correctly mounted on the 4-jaw chuck.
4-Jaw Chuck
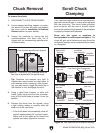
Refer to the Chuck Installation or Chuck
Removal
sections for instructions on installing or
removing the 4-jaw chuck.
The 4-jaw chuck features independently adjust-
able jaws for holding non-concentric or off-center
workpieces. Each jaw can be independently
removed from the chuck body and reversed for a
wide range of work holding versatility.
Because of the dynamic forces involved in
machining a non-concentric or off-center
workpiece, always use a low spindle speed
to reduce risk of the workpiece coming loose
and being thrown from the lathe, which could
cause death or serious personal injury.
Mounting Workpiece
1.
DISCONNECT LATHE FROM POWER!
2.
Place a chuck cradle or plywood on the bed-
way below the chuck to protect the bedway
surfaces.
3.
Use the chuck key to open each jaw so the
workpiece will lay flat against the chuck face,
jaw steps, or into the spindle opening.
4.
With help from another person or a holding
device, position the workpiece so it is cen-
tered in the chuck.
5. Tighten each jaw in small increments. After
you have adjusted the first jaw, continue
tightening the remaining jaws in an opposing
sequence, as shown by the sequential order
in the Figure below.
6. After the workpiece is held in place by the
jaws, use a dial indicator to make sure the
workpiece is centered in the chuck.
— If the workpiece is not correctly centered,
make fine adjustments by slightly loosen-
ing one jaw and tightening the opposing
jaw until the workpiece is correctly posi-
tioned (see below for an example).