


-50-
Model G0746/G0749 (Mfg. Since 3/13)
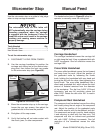
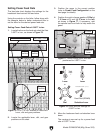
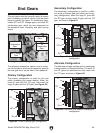
The handwheels shown in Figure 69 allow the
operator to manually move the cutting tool.
Carriage Handwheel
The carriage handwheel moves the carriage left
or right along the bed. It has a graduated dial with
0.005" increments. One full revolution moves the
carriage 0.55".
Cross Slide Handwheel
The cross slide handwheel moves the tool toward
and away from the work. Adjust the position of
the graduated scale by loosening the thumb
knob, holding the handwheel with one hand and
turning the dial with the other, then tightening the
thumb knob. The cross slide handwheel has a
direct-read graduated dial, which shows the total
amount of material removed from the diameter
of the workpiece. The dial has 0.004" (0.01mm)
increments, and one full revolution moves the
slide 0.200". Rotate the dial collar 180° to read in
metric units.
Compound Rest Handwheel
The compound rest handwheel moves the cutting
tool linearly along the set angle of the compound
rest. Adjust the position of the graduated scale
in a similar manner with the handwheel and dial.
The compound rest angle is set by hand-rotating
it and securing in place with four hex nuts. The
compound rest has an indirect-read graduated
dial with 0.002" (0.05mm) increments. One full
revolution of the handwheel moves the slide
0.200".
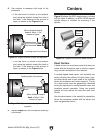
Figure 69. Carriage Controls.
Carriage
Handwheel
Cross Slide
Handwheel
Tools Needed Qty
Hex Wrench 5mm .............................................. 1
Hex Wrench 8mm .............................................. 1
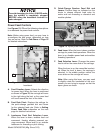
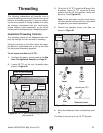
To set the micrometer stop:
1. DISCONNECT LATHE FROM POWER!
2. Use the carriage handwheel to position the
carriage and cutting tool at the desired stop-
ping point, then loosen the front cap screws
on the micrometer stop (see Figure 68).
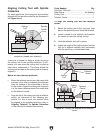
Use the micrometer stop as a guide to help judge
when to stop carriage movement.
The micrometer stop on this lathe will
NOT automatically stop the carriage during
threading operations when the carriage
is engaged with the leadscrew! Failure to
heed this notice could result in the carriage
crashing and causing severe machine or
property damage.
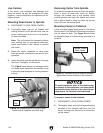
Micrometer Stop
3. Move the micrometer stop up to the carriage,
loosen the rear cap screws, then adjust the
graduated dial to fine-tune the position.
4. Re-tighten all the cap screws.
5. Verify that tooling will not make contact with
the chuck, jaws, or other components.
Figure 68. Micrometer stop.
Rear Cap
Screws
Front Cap
Screws
Graduated
Dial
Compound
Rest
Handwheel
Manual Feed