


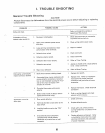


PROBLEM POSSIBLE CAUSE ACTION
1, No loop in drain line., {Undercounter t_ All drain lines must have an elevated
Dishwashers) Ioop_ Refer to installation
instructions,
Drains or water syphons
out of dishwasher after
a fill for either a wash
or rinse.
2_
Drain line connected after "J" trap
(undereounter washers).
Drains must be connected ahead of
"J" trap or into top end of a garbage
disposal. Refer to installation
.instructions,
3o Recirculating hose from pump to top
spray tube partially or totally
restricted.
3o Check circulation of water system,
Clear any restrictions or blockage.,
4. Main motor running in wrong direction
(start phase wires reversed at timer or
motor,,
4. Refer to wiring diagram for proper
connections,
Dishwasher will not
drain_
t, Drain port in pump casting totally
obstructed,
1. Clean drain port., If unable to clean,
replace casting.
NOTE: Approxo 2 pints
of water will remain
in bottom of the tub.
2o Main motor won't run in clockwise
direction (open start phase winding).
3,, Vanes broken off the lower impeller.
24
3_
Refer to wiring diagram for pump out
period and check voltage to motor°
Dismantle top section of pump
assembly - visually inspect.
4, Drain line kinked or collapsed (total
restriction),
4° Check drain line,
5 Open circuits between timer output
terminal and motor,
5o Refer to wiring diagram and check out
run and drain phase motor circuits for
loss of voltage.
6. Open timer contacts for motor start
and run windings,
6, Refer to wiring diagram for closed
timer contact period° Check voltage
through timer for these periods.
Dishwasher does not
draln completely,,
I. Drain line too small..
1. The drain line must never be under
1/2 inch inside diameter.
NOTE: Approx, 2 pints
of water will remain in
the bottom of the tub,
which is a normal
condition,
2, Clogged coupler (portable model),
3, Drain line loop too far from dishwasher.
(Water drains back into dishwasher,
Long drain lines onlyo)
2. Visually inspectand clean,,
3. Loop must be close to dishwasher_
Refer to installation instructions_
8B