


Operating the Meter108
7. Enter any special calibration frequencies on the extra
lines provided and enter the appropriate calibration
factors. Delete any standard calibration frequencies
that were not used.
8. Click on the I
nstall Probe button. A dialog box will
appear asking you if you are sure you want to install
the probe.
9. Click on OK. The program will automatically send the
calibration information to the meter via the modem and
cable. The program will then verify that the probe has
been successfully installed in the meter by reading the
meter’s memory.
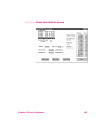
10. The model number and the serial number of the probe
just installed will now appear in the table of Installed
Probes.
11. To leave the Probe Installation window and return to
the main menu click the Close button.
Removing Installed Probes
To remove a specific probe from the meter’s memory...
1. First view an installed probe as described in Viewing
Installed Probes.
2. Click on the R
emove Probe button. A dialog box will
appear asking you to confirm that you want to remove
a probe from the meter’s memory.
3. Click OK. The probe will automatically be removed
from the meter’s memory.
4. The model number and the serial number of the probe
just removed will disappear from the table of Installed
Probes.
5. To leave the Probe Installation window and return to
the Main Menu Window click the Close button.