


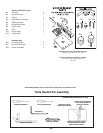
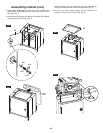

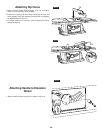

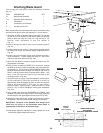

Attaching Front Rails
Locate the two front rail pieces T8, T9, the connector T10, 4
spacers T21, 4 screws T20 and 4 nuts T22 (Fig. 10) from among
the loose parts.
1. Make sure that the wings are properly installed with the red
latch levers to the front of the table saw table.
2.
Connect the two front rail pieces with the
measurement scale on the top using the
connector provided.
3. Insert the 4 screws through the rail and into
the 4 spacers.
4. Align the rail with the holes in the front edge.
5. Insert screws into the front edge and tighten the 4
nuts to secure to the rail.
44.
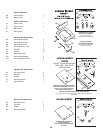
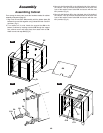
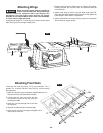
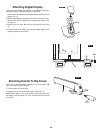
Attaching Wings
Wings and blank insert must be installed in
order to use the table saw. Wings and blank
inserts create the complete table and support the
w
orkpiece. Use the jigsaw insert without the jigsaw
a
ttached for the second blank insert. Never use the sander
o
r router insert in table saw mode.
Locate the two wings T6, T7, Allen wrench T19 and 10 Allen head
b
olts T20 (Fig. 9) from among the loose parts.
1. Remove wings from box. Orient them as shown in the picture,
m
aking sure that the red latch levers are oriented toward the
front of the unit.
2. Attach each wing as shown using the Allen head bolts T20.
Each wing should be fastened using five bolts. Firmly tighten the
b
olts using the Allen wrench T19 provided.
3. Attach the desired insert into each wing (see more information
about inserts on pages 52-58).
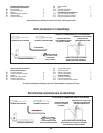
º
5
º
1
0
º
1
5
º
2
0
º
2
5
º
3
0
º
3
5
º
4
0
º
4
5
º
T6
T7
T20
0
º
FIG. 9
FIG. 10
T8
T21
T7
T20
T10
T6
T9
T22
WARNING
!
FIG. 9
FIG. 10